IV Pacemaker and ICD implantation technique
🚀 This section is here to help you learn how to implant an intravenous pacemaker / ICD 🫀⚡.
I’ll walk you through the different steps 📝🔧. There isn’t just one way to do it – here I’m sharing what I learned from my amazing seniors 🙌, to whom I’m super grateful: Prof. Le Polain De Waroux Jean Benoit and Prof. Tavernier René 👨⚕️👨⚕️.
🔑 Step 1: Get the indication right! 🧐📋
🔑 Step 1: Get the indication right! 🧐📋
Before jumping into wires and generators ⚡🫀, the very first thing is to make sure your patient really needs a pacemaker or an ICD. Once the indication is solid ✅, it’s time to prep your patient 🛏️🧑⚕️— because good preparation is half the job done! 💪😎
✌️ Step 2: Find your landmarks! 🧭🦴
✌️ Step 2: Find your landmarks! 🧭🦴
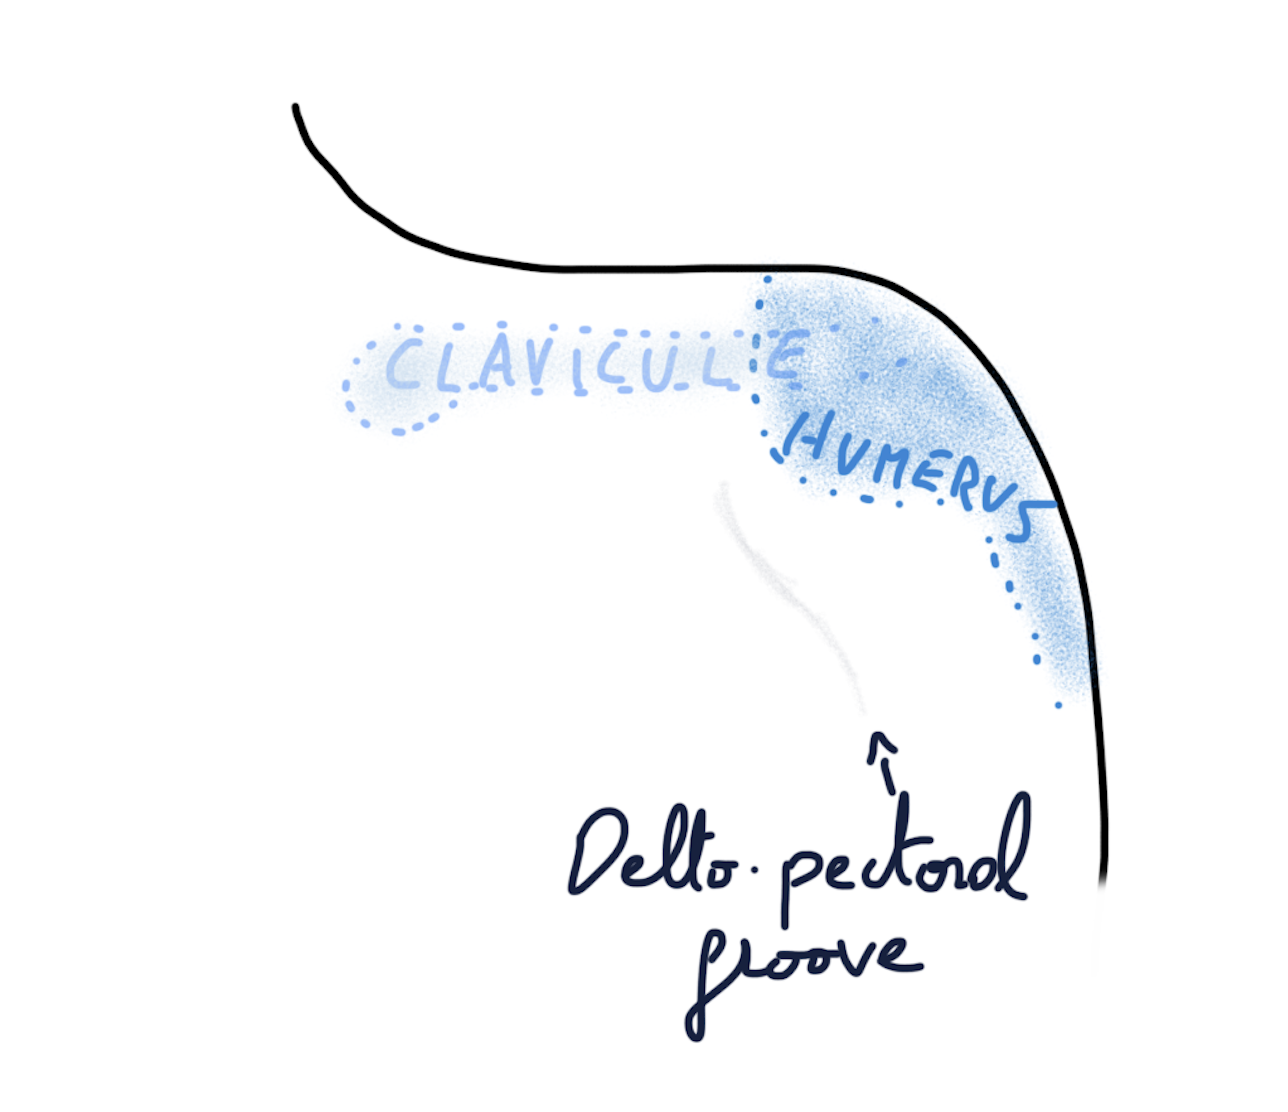
Before grabbing your needle 🪡, take a moment to spot the key anatomical checkpoints:
🦴 Clavicle
💪 Humerus
🔻 Deltopectoral groove
🫁 Sternal notch
🔗 Clavicle–1st rib junction
👉 These landmarks are your GPS 🛰️ — without them, you’re basically implanting blindfolded 😅.
💉 Step 3: Local anesthesia time! 😌🛌
💉 Step 3: Local anesthesia time! 😌🛌
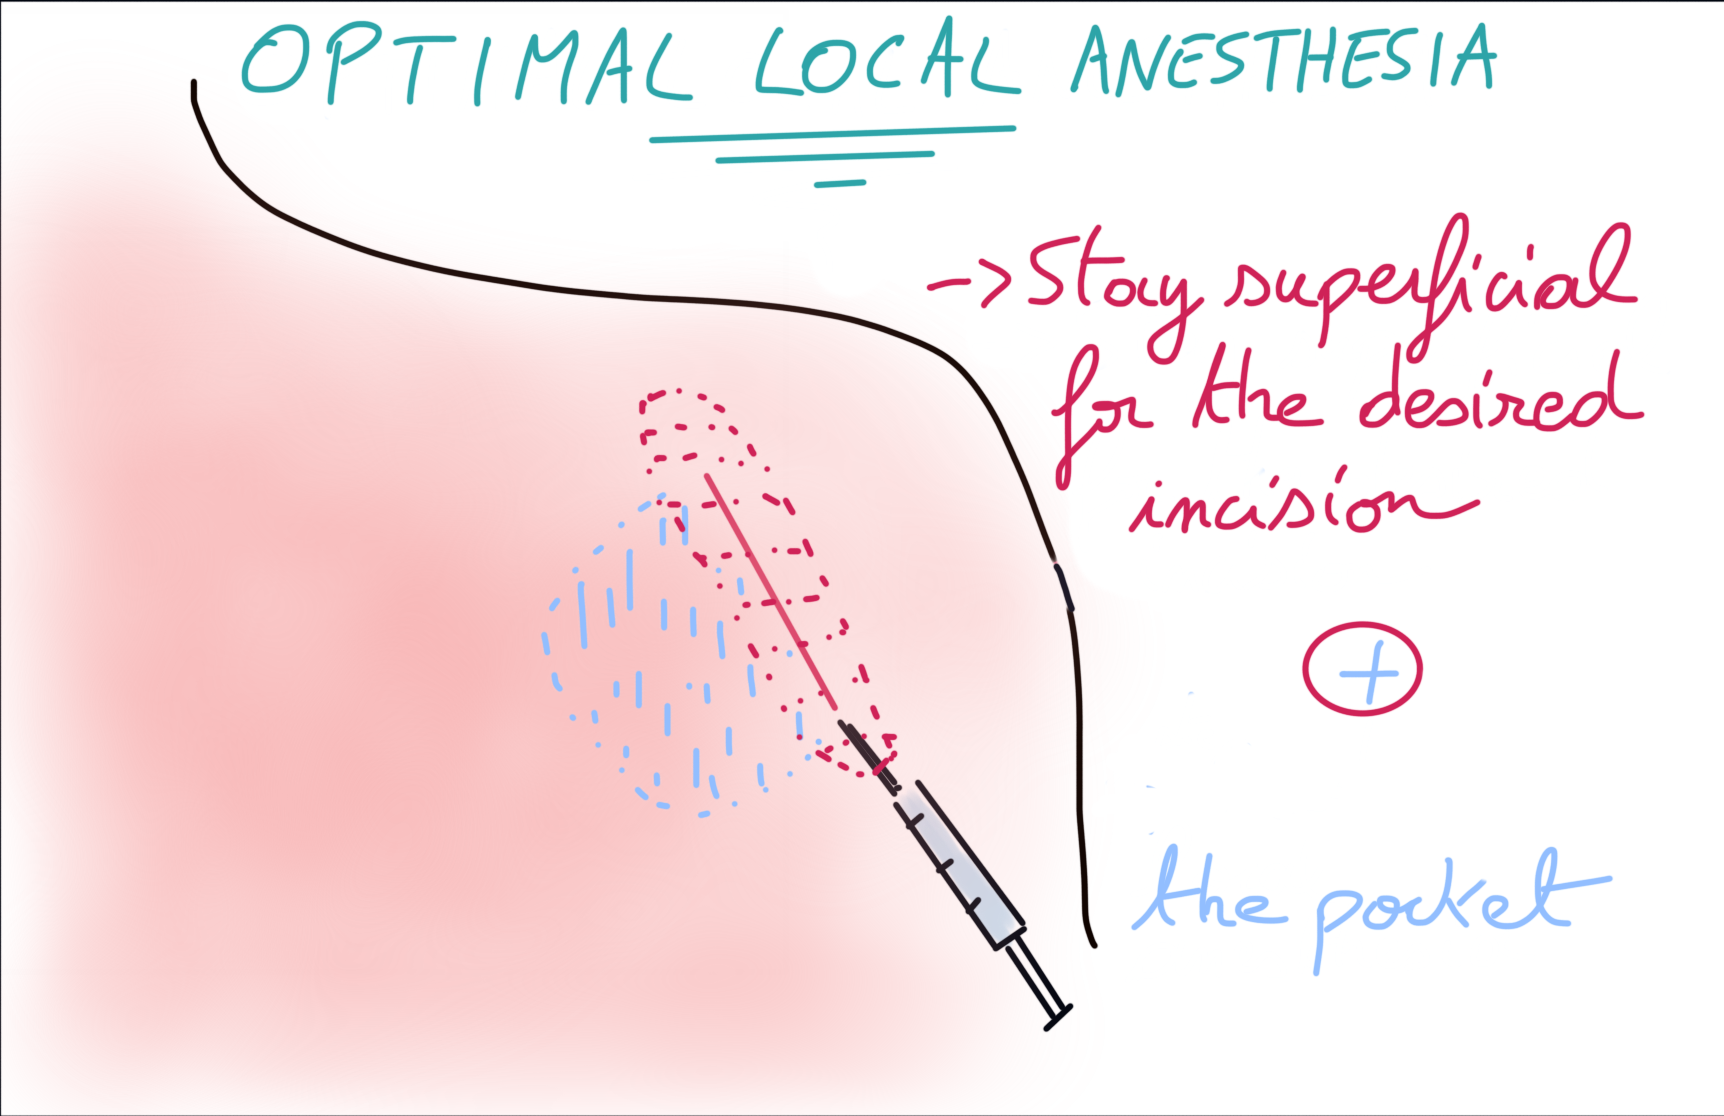
This step is super important for the patient’s comfort during the whole procedure ❤️.
👉 Make sure you numb:
The skin (very superficial — not the fat! 😉)
The deeper layer where the pacemaker/ICD pocket will be created 🛠️📦
Think of it like setting “airplane mode” ✈️ on the surgical field: calm, quiet, and comfy for your patient. 🧘♂️
✂️ Step 4a: Choose your incision style! 🎨🔪
✂️ Step 4a: Choose your incision style! 🎨🔪
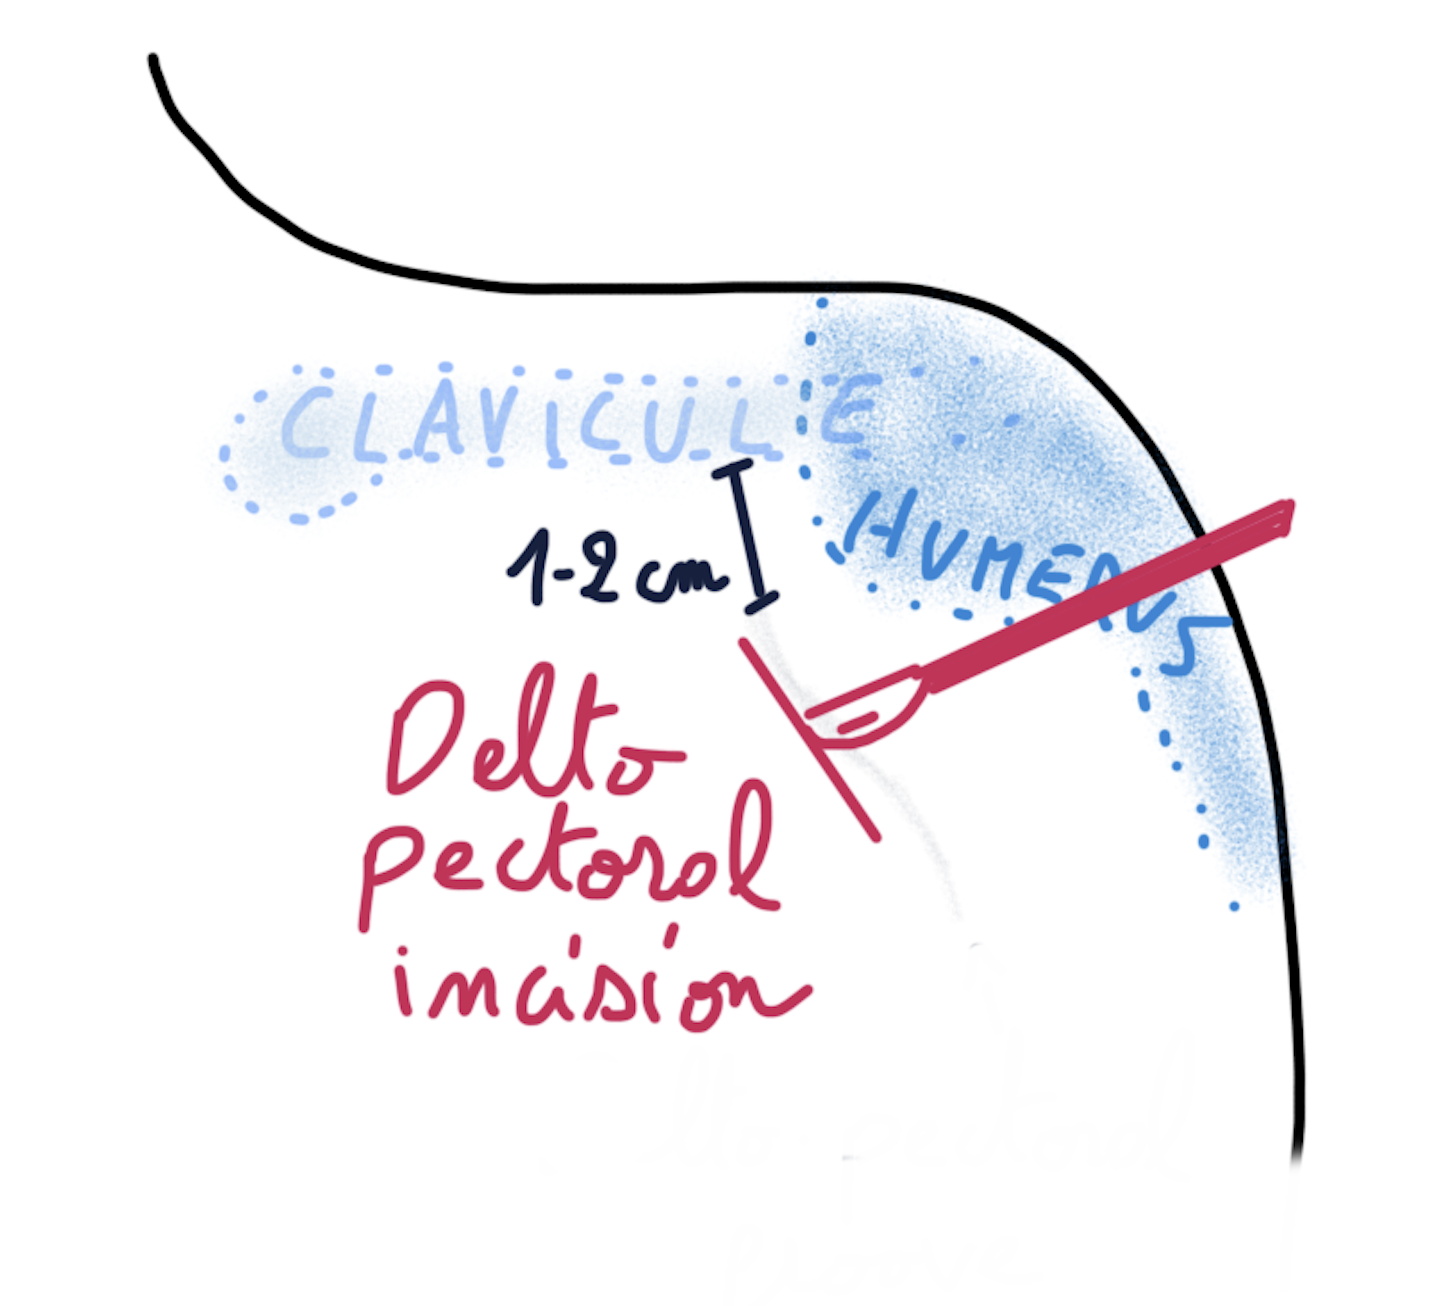
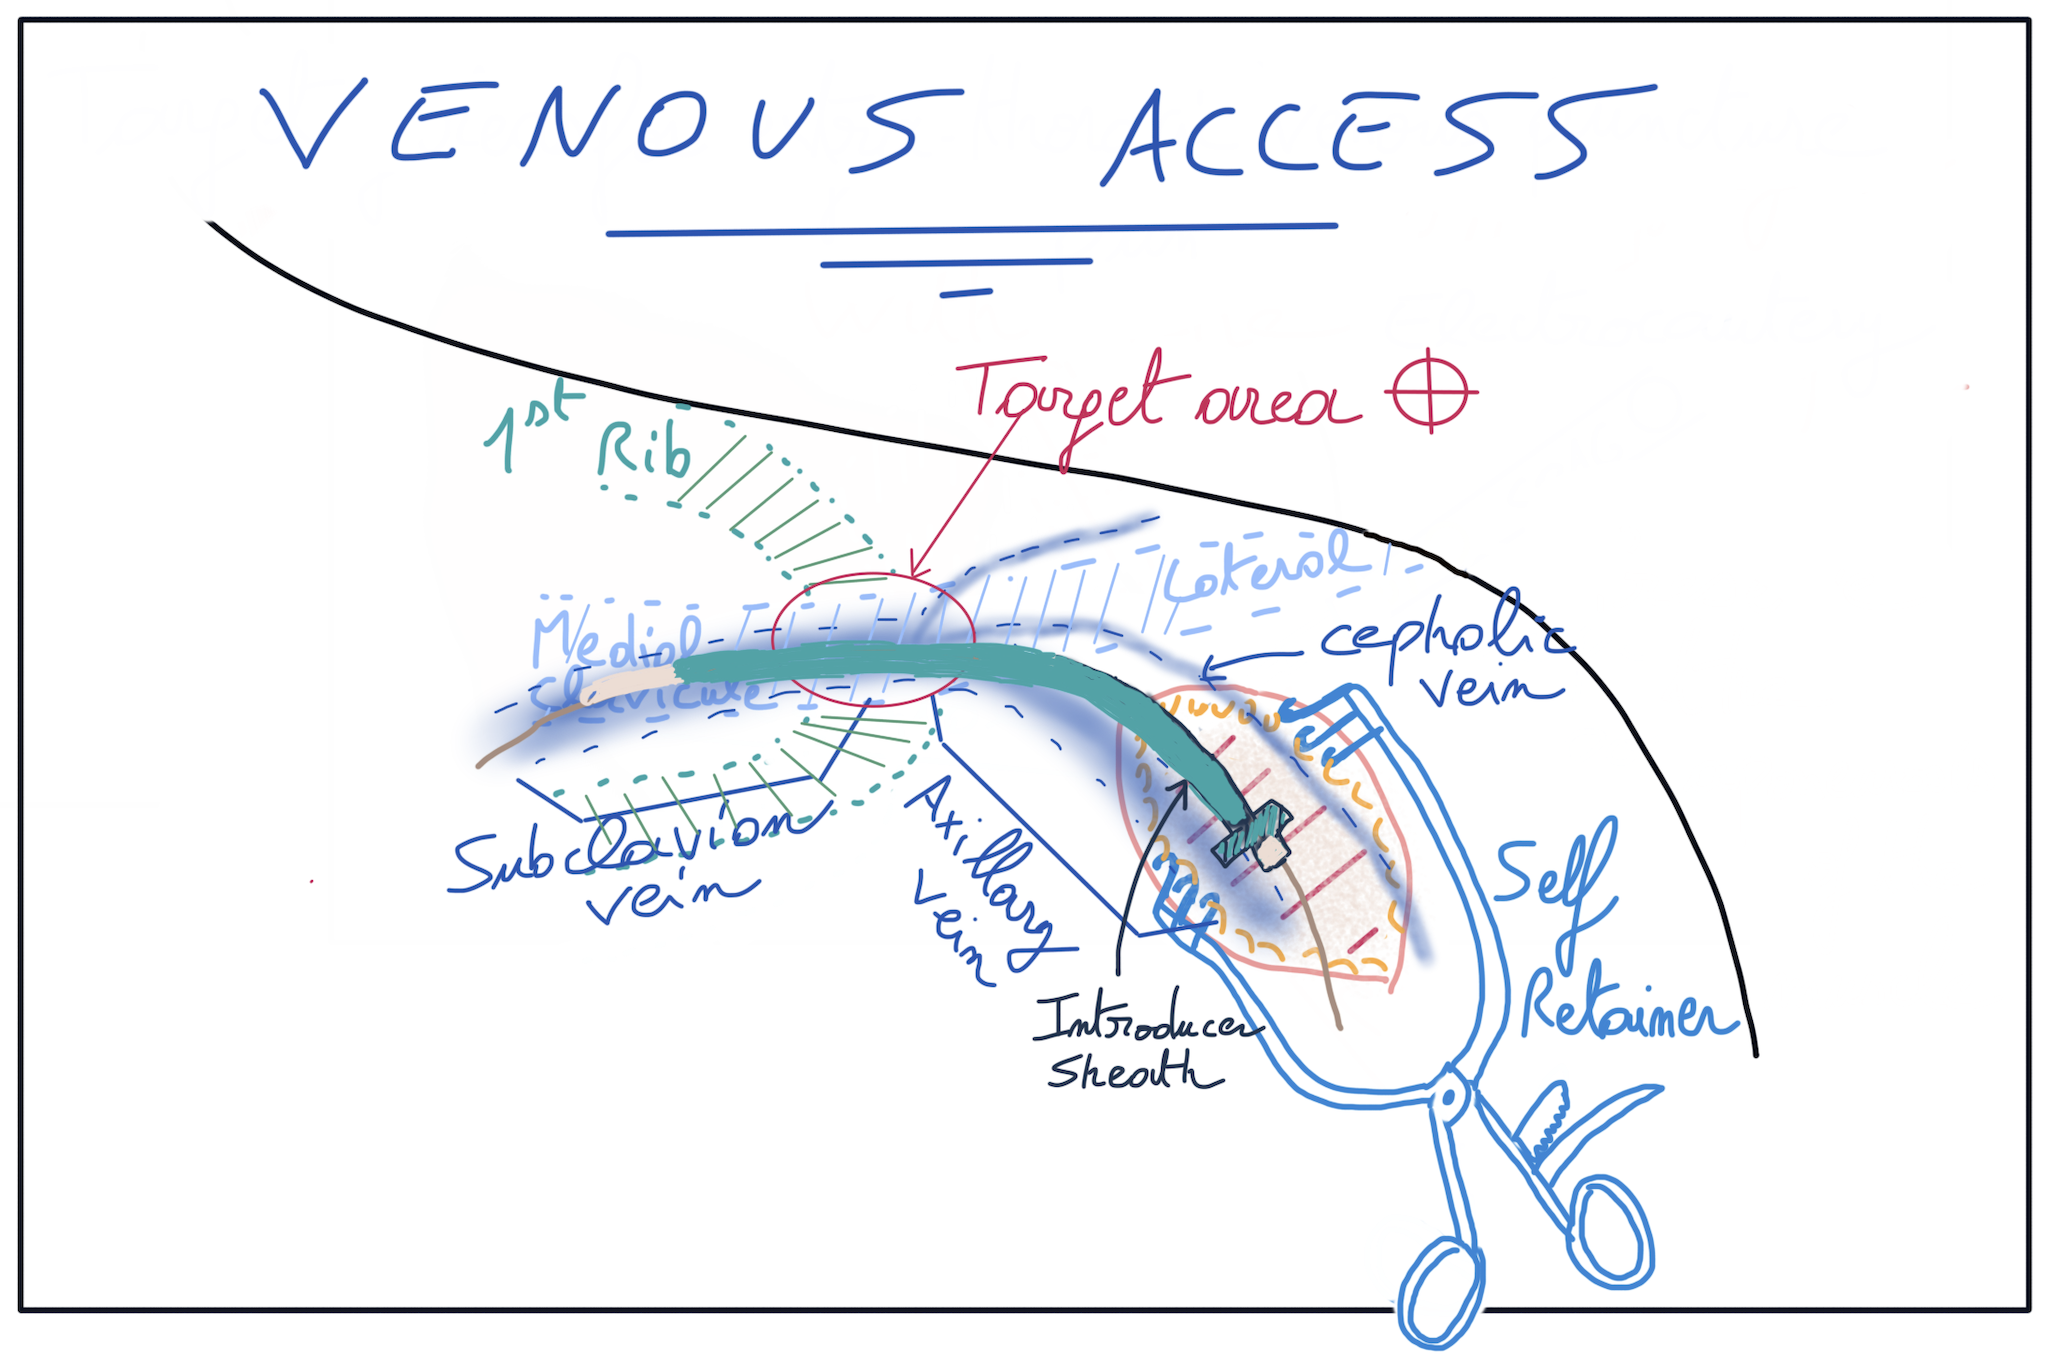
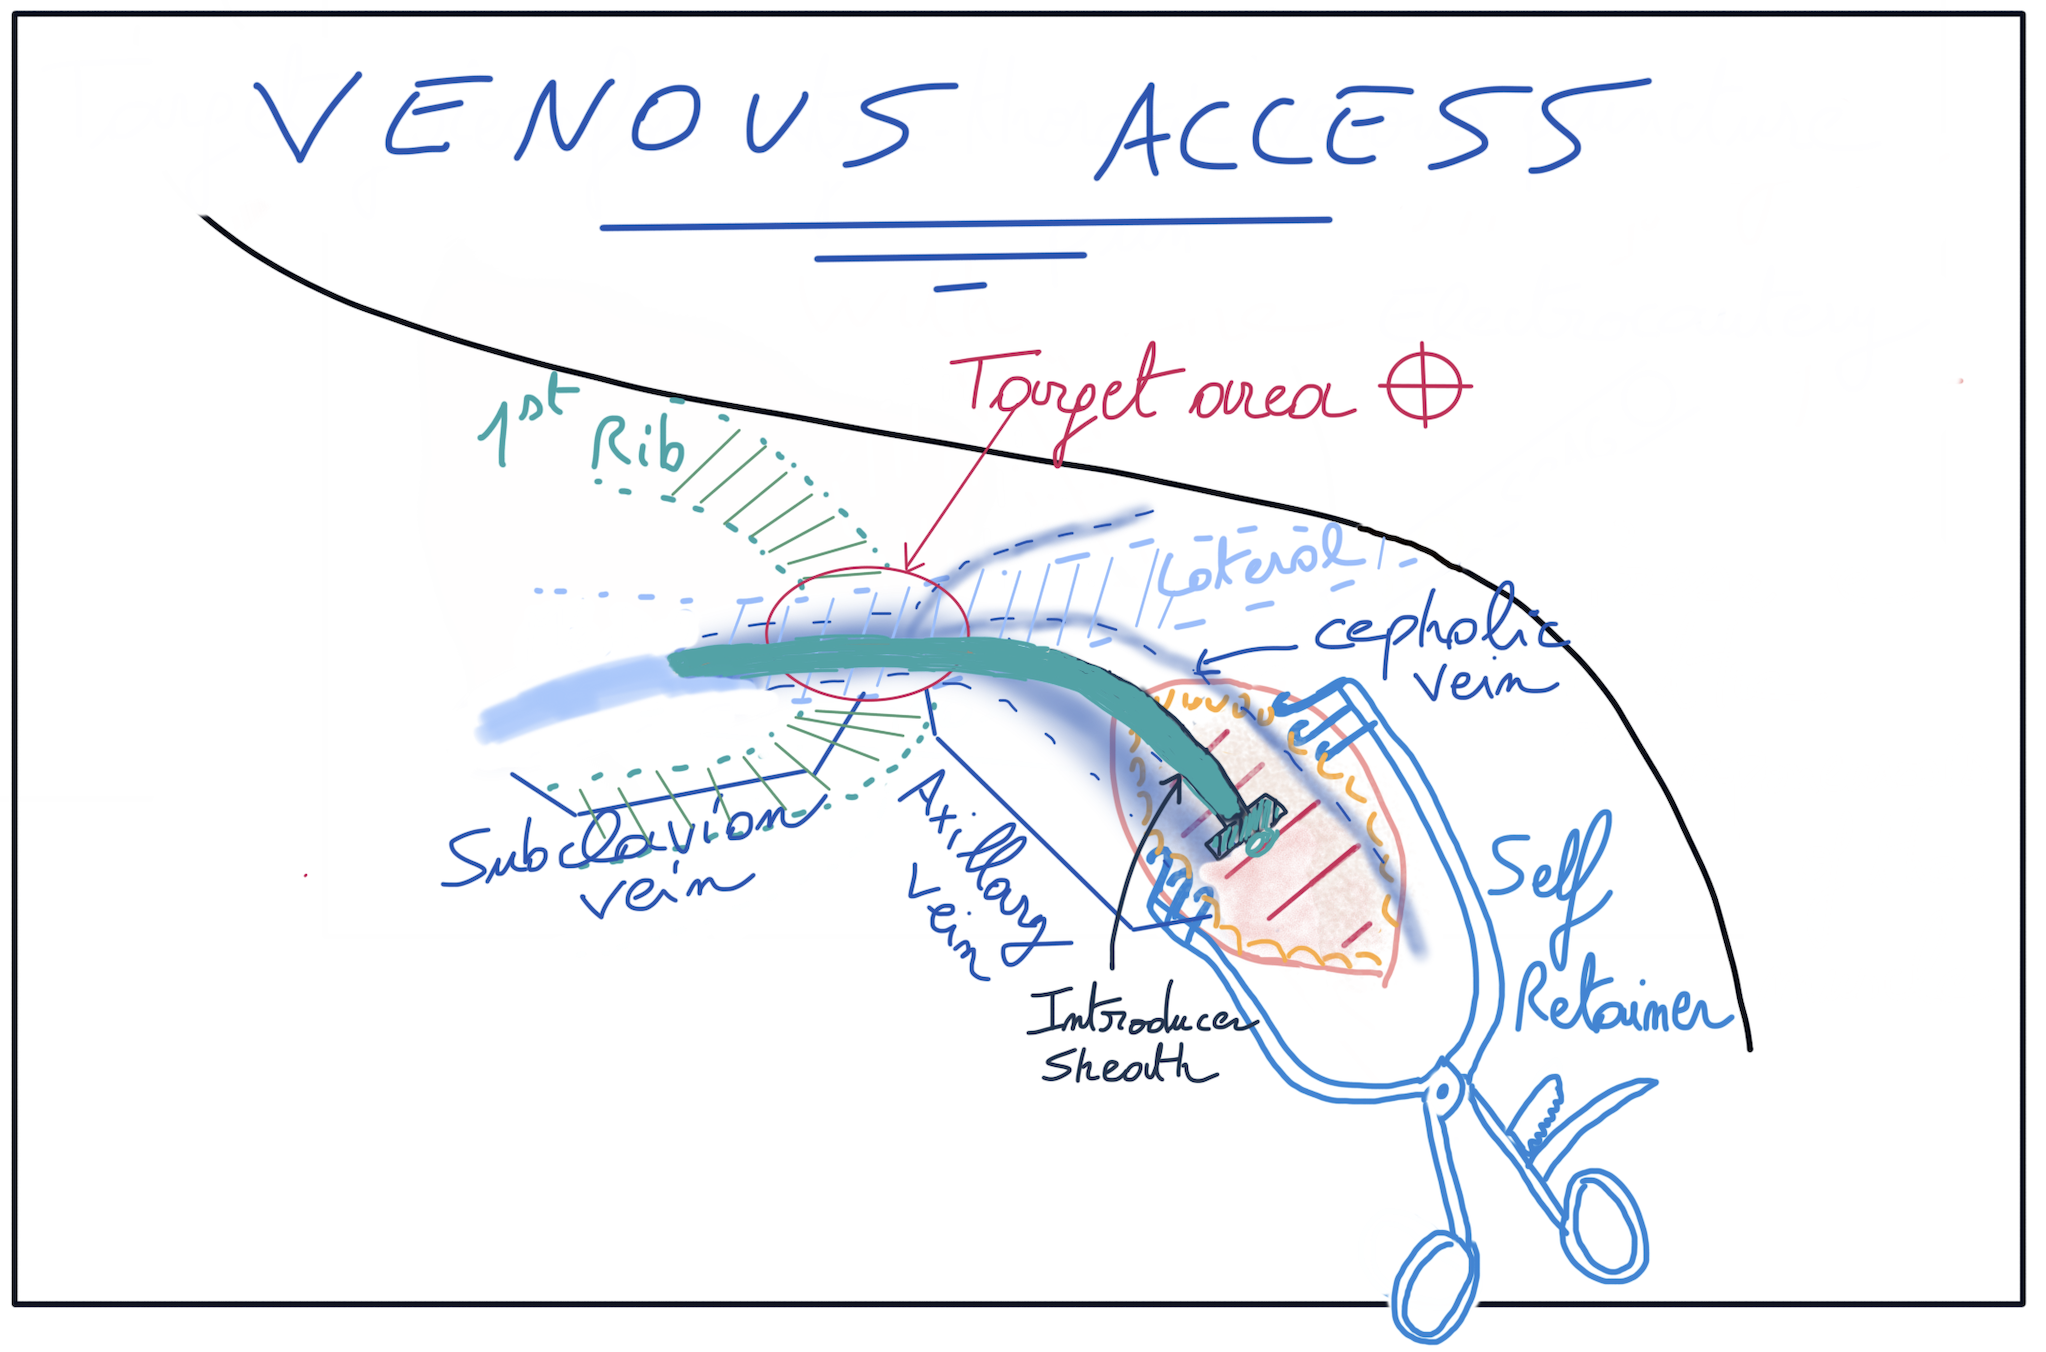
Time to get creative (safely 😅). You’ve got options, but here I’ll show you the horizontal incision ➖.
👉 With this approach, your goal is simple: puncture the axillary vein or the subclavian vein 💉🩸.
Think of it like opening the right “door” 🚪 to get smooth access inside.
🔀 Step 4b: Go for the oblique cut! ✂️📐
🔀 Step 4b: Go for the oblique cut! ✂️📐
If you want more flexibility, choose an oblique incision ↗️.
👉 This way, you can reach both the cephalic vein 🩸 and the axillary vein at the same time. Double access, double options 🎯💪.
Think of it as opening a sliding door 🚪— wider view, more freedom!
🪓 Step 5: Dissection time! 🔥
🪓 Step 5: Dissection time! 🔥
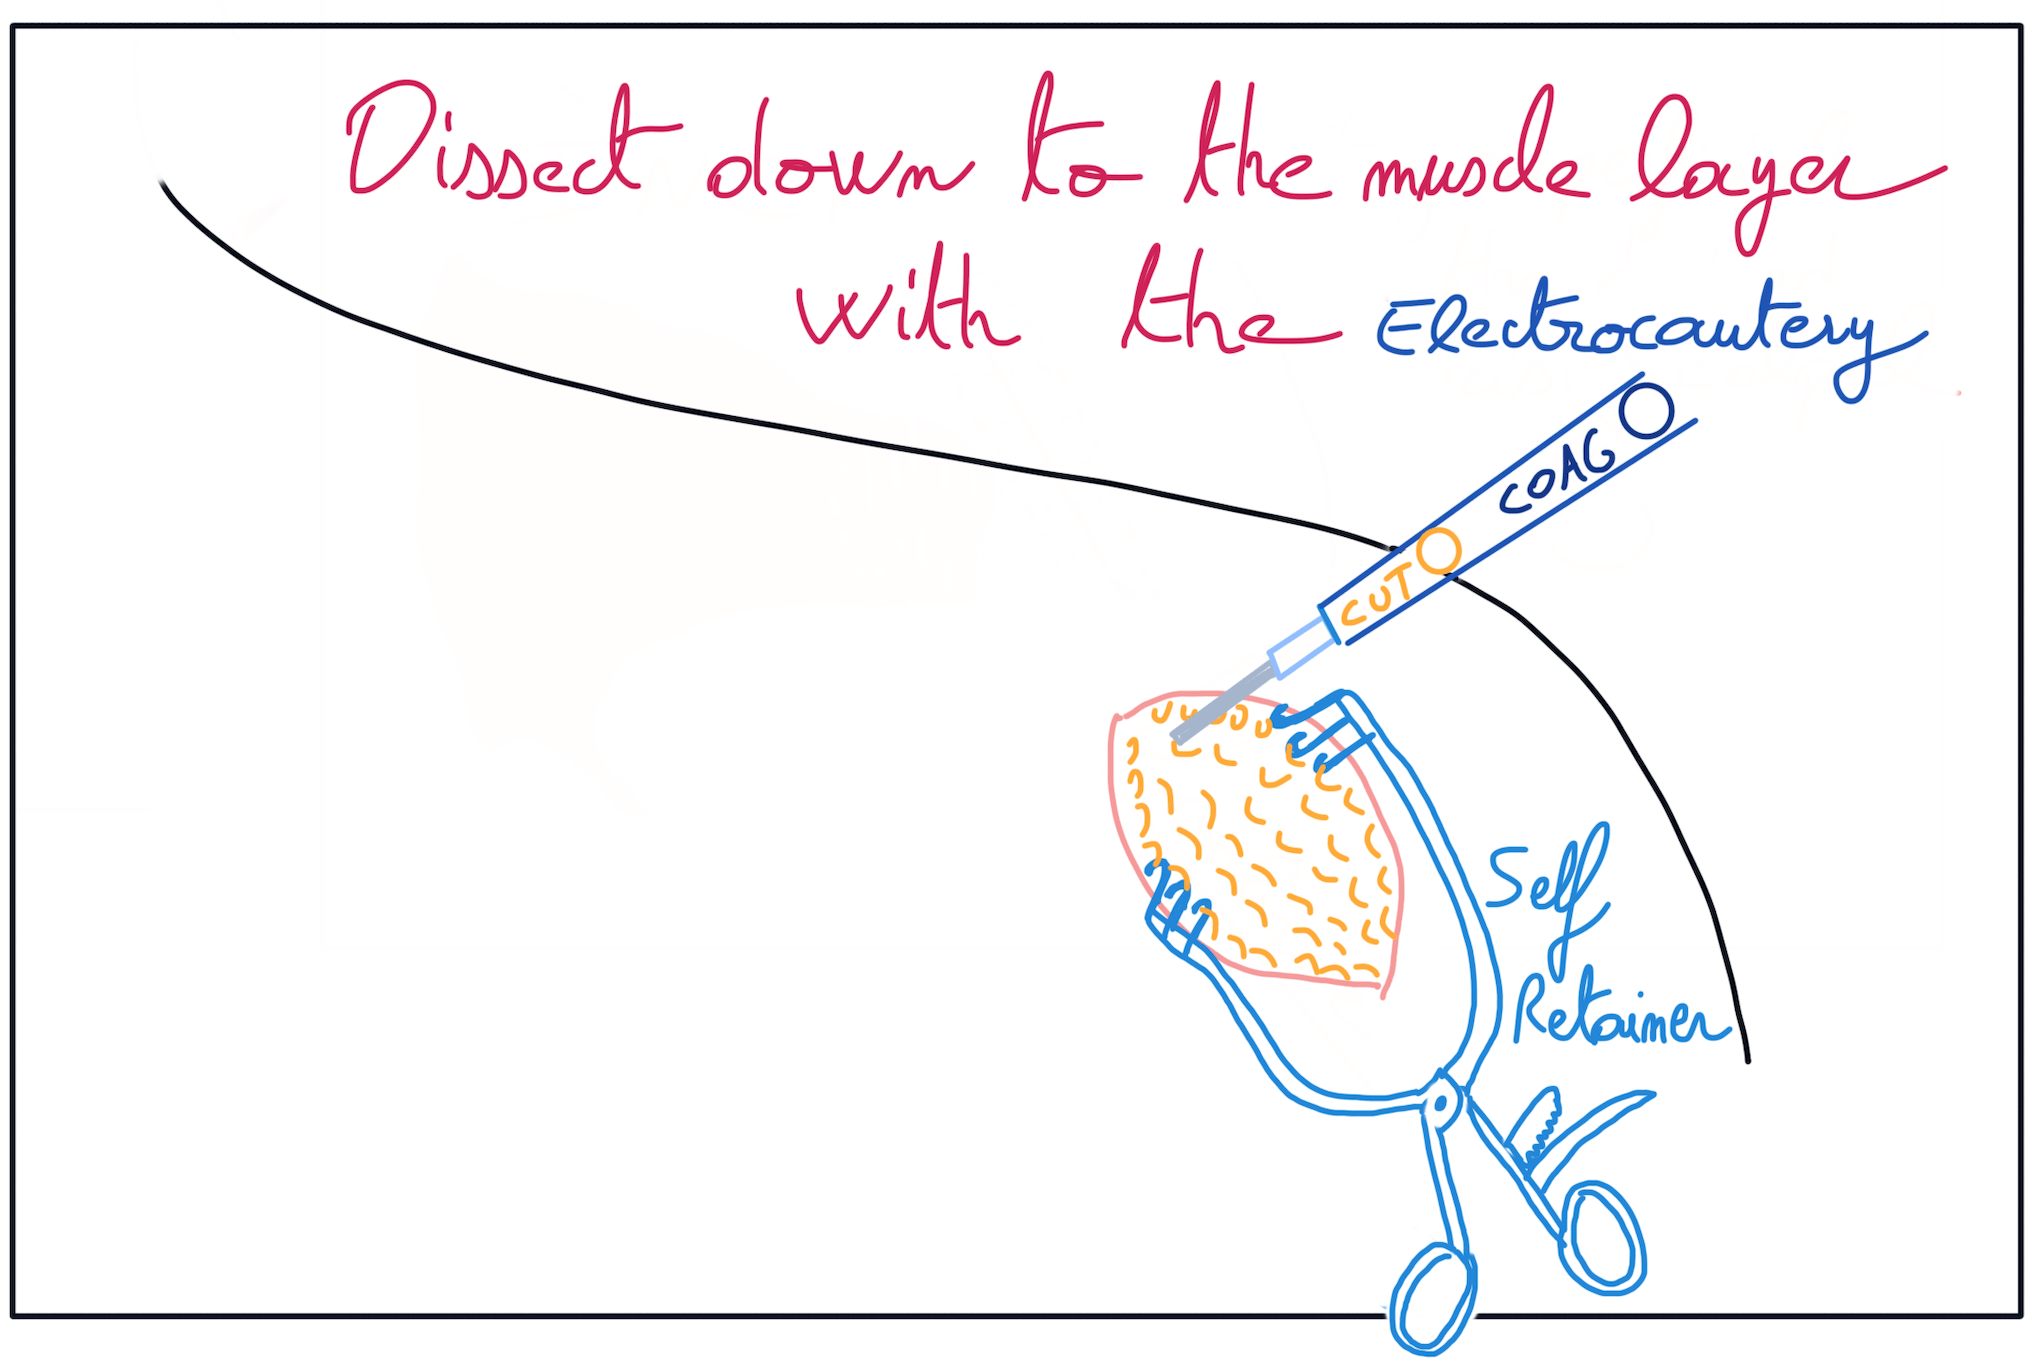
After opening the skin with your scalpel ✂️, it’s time to dive deeper.
👉 Use electrocautery ⚡ to carefully dissect through the fat until you reach the muscle 💪.
But here’s the golden rule 🏅: respect the muscle fascia (aponeurosis) — don’t burn your bridges (literally 😅).
Think of it like tunneling 🚇: precise, controlled, and always keeping the walls intact.
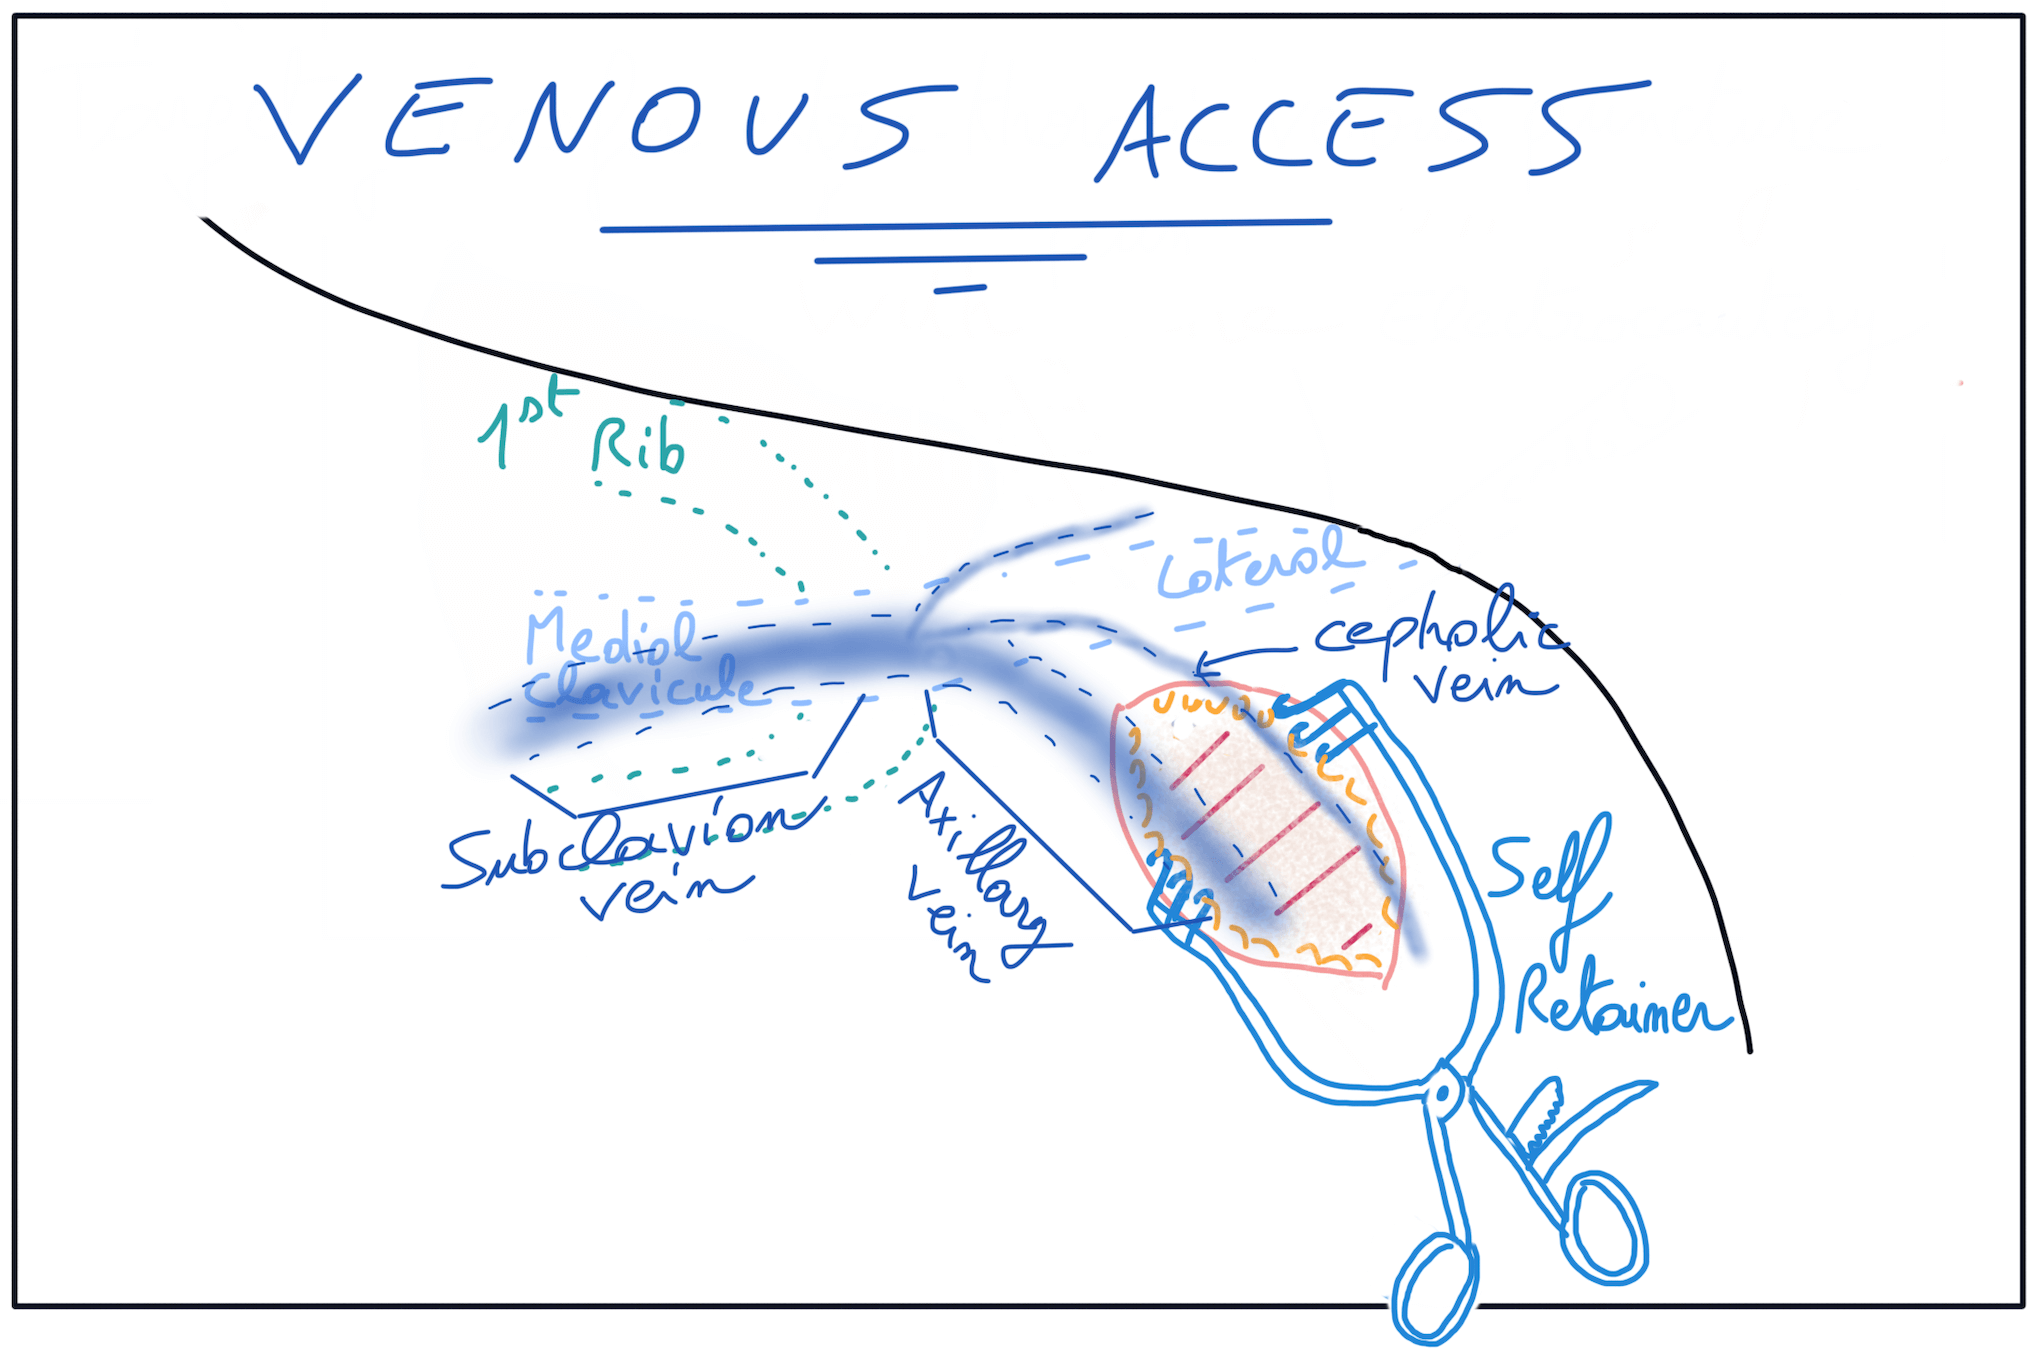
👀 Step 6: Visualize the fascia & find your vein network! 🕵️♂️
👀 Step 6: Visualize the fascia & find your vein network! 🕵️♂️
Once you’ve reached the muscle fascia 💪, it’s time to orient yourself using your trusty anatomical landmarks 🧭:
🦴 Clavicle
1️⃣ First rib
🫁 Supra-sternal notch
🔗 Clavicle–1st rib intersection
👉 Right there lies your venous highway 🩸🚦— the access point to your pacemaker/ICD journey.
Think of it like standing at a crossroads 🚧: know your landmarks, and you’ll never get lost!
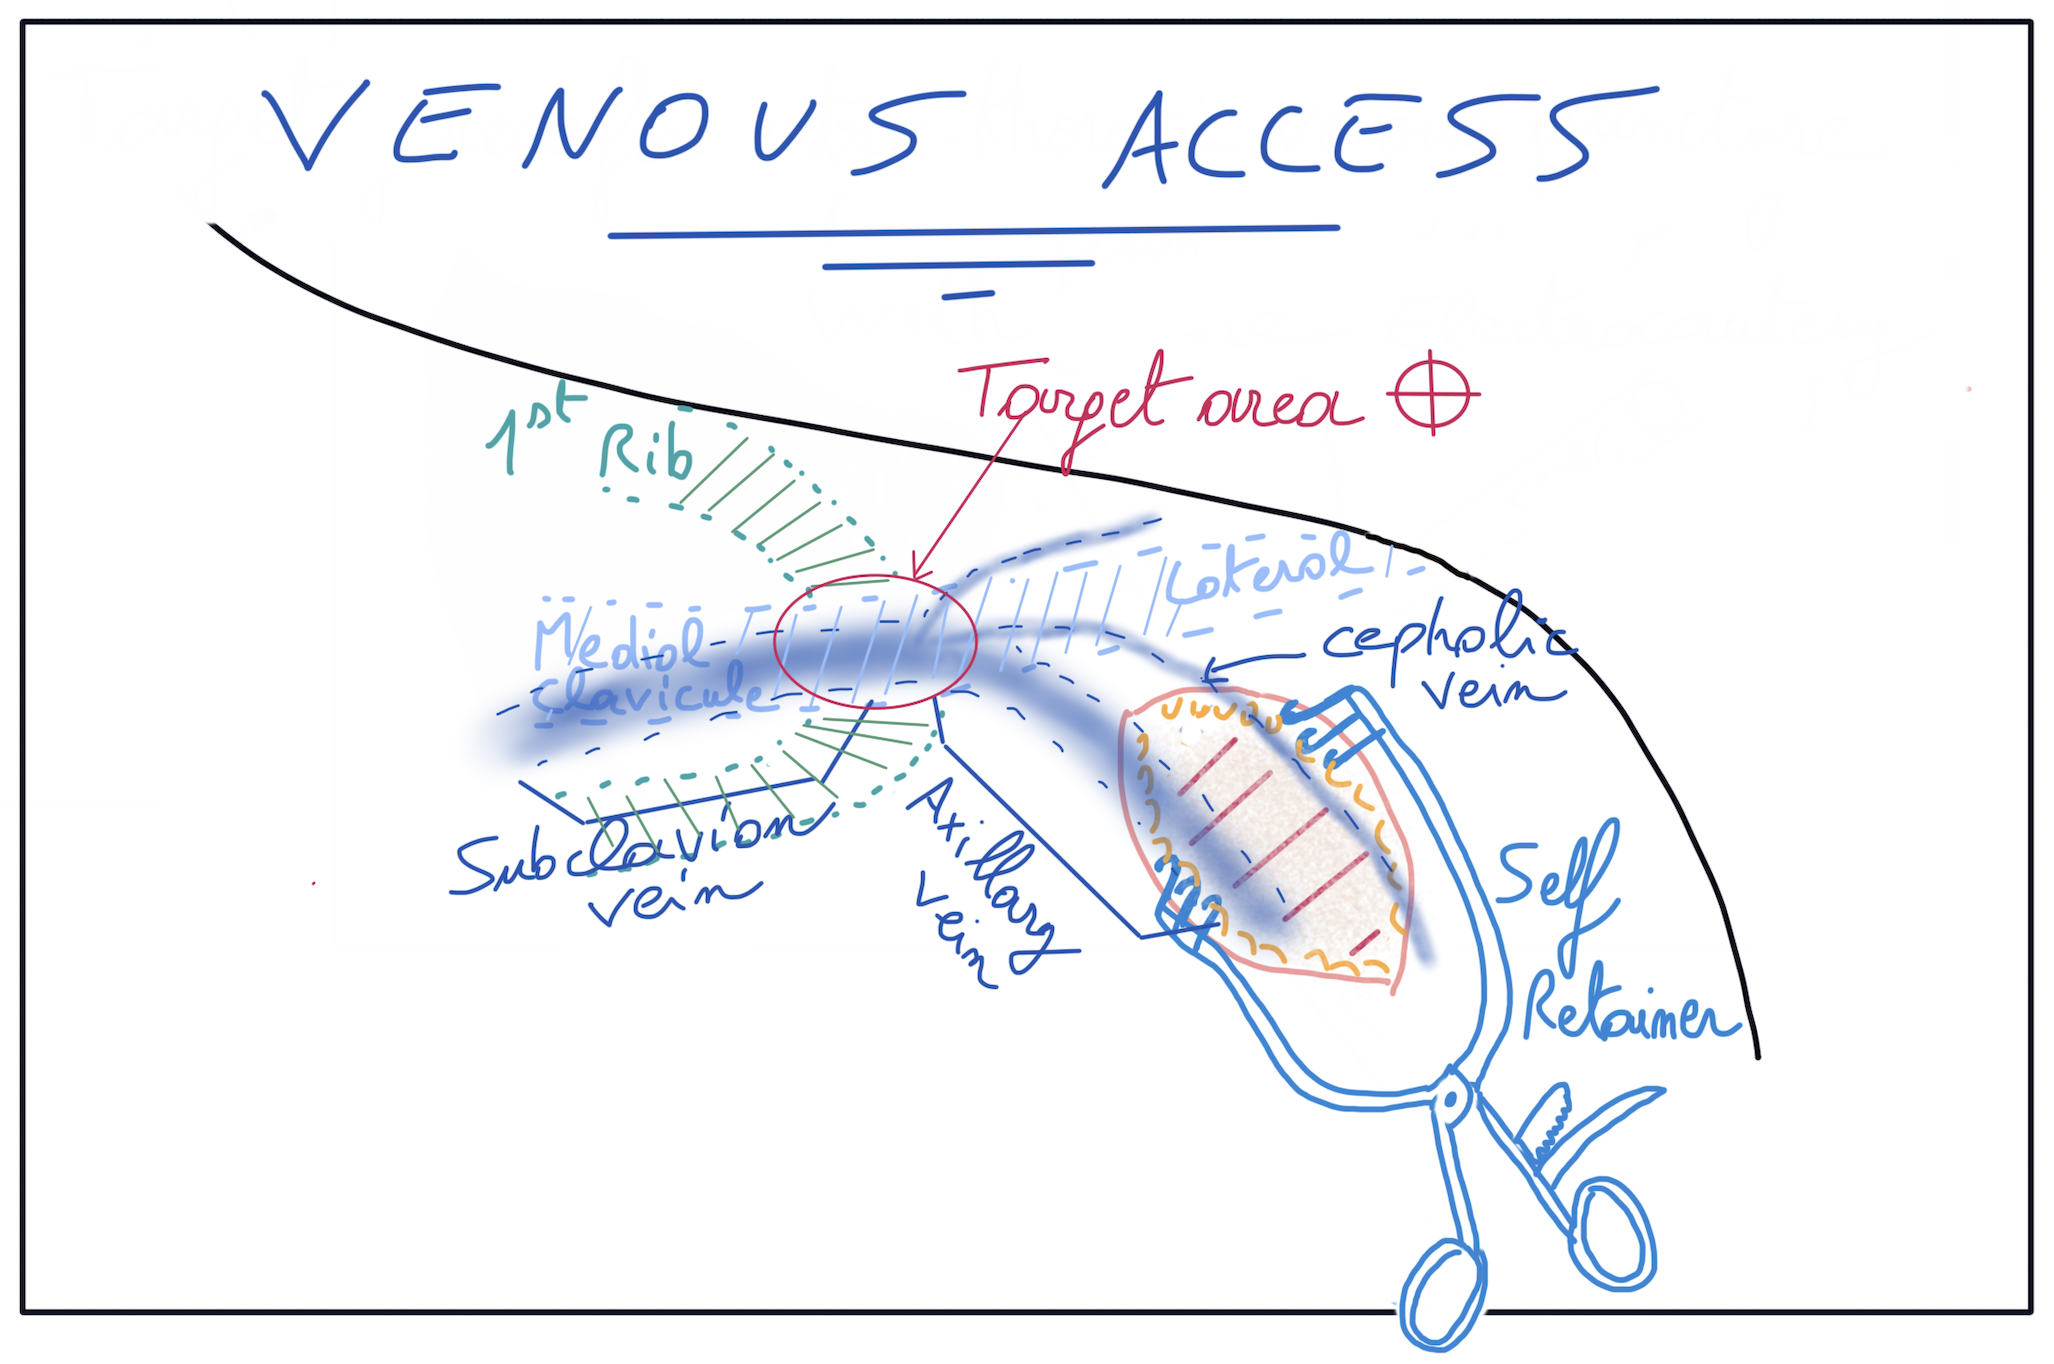
🎯 Step 7: Time for the needle game! 🪡💦
🎯 Step 7: Time for the needle game! 🪡💦
Grab your needle with a syringe filled with a bit of saline 🌊— this will help you feel the “flash” when you hit the vein.
👉 A little trick I like: curve the needle slightly upward ⤴️ to avoid the lung 🫁.
Your target? The proximal axillary vein right at the intersection of the first rib and the clavicle 🦴.
🖐️ With your left hand, use your anatomy GPS:
Index 👉 on the supra-sternal notch
Thumb 👍 on the clavicle–1st rib junction
This gives you a clear “line of sight” for your needle trajectory.
✋ Meanwhile, your right hand is free to control the syringe like a pro 🧑⚕️💪.
Think of it like playing a video game 🎮: left hand = joystick for aiming, right hand = trigger for action.
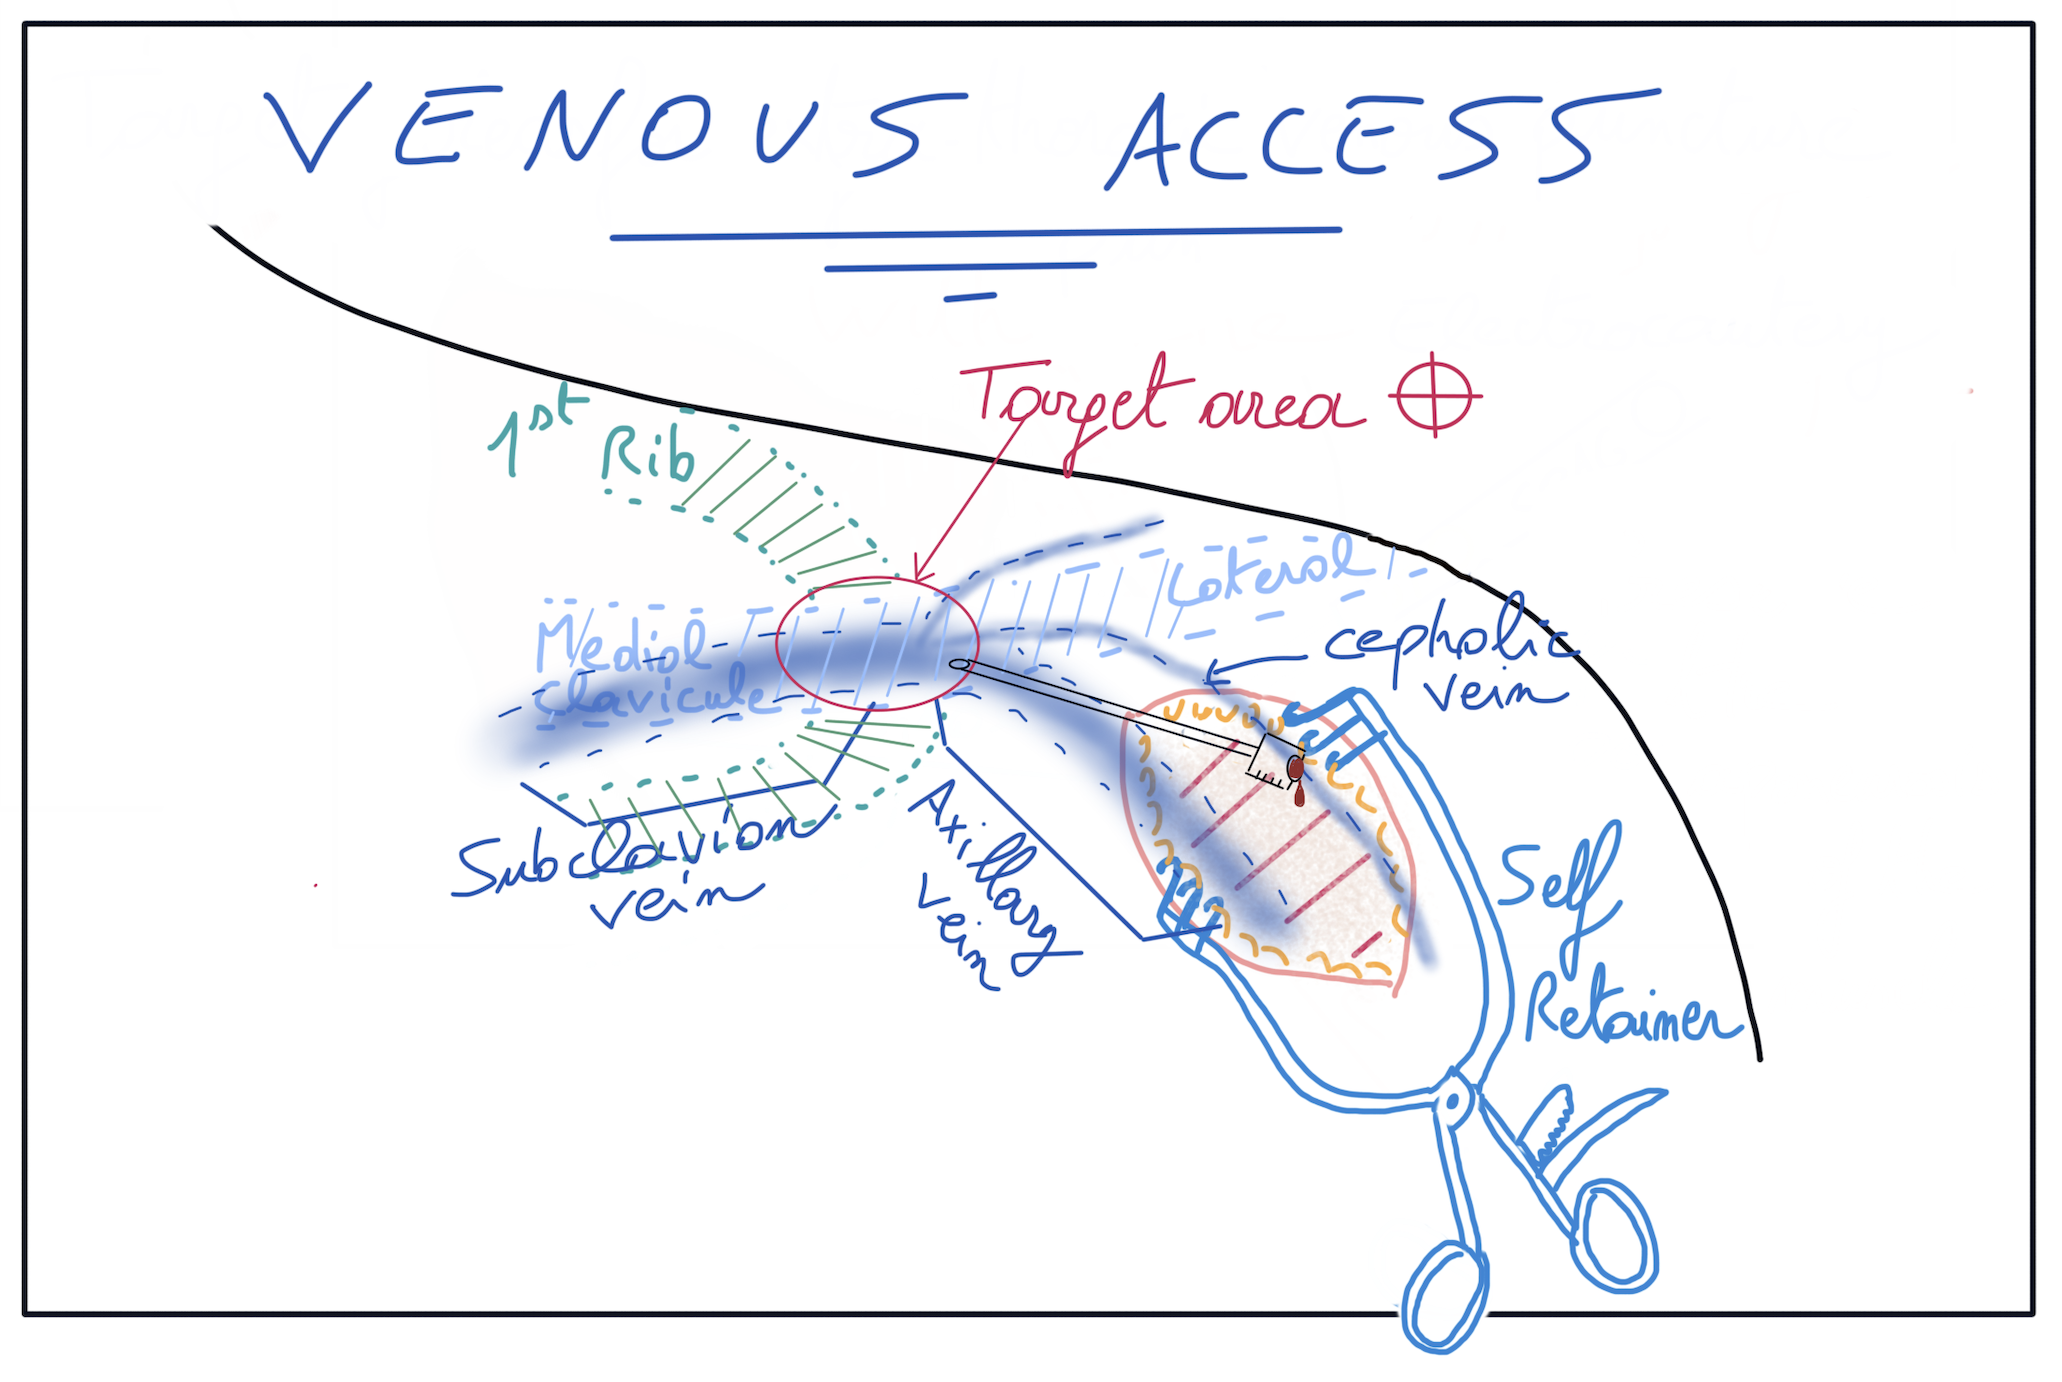
➡️ Step 8: Advance the needle carefully! 🪡
➡️ Step 8: Advance the needle carefully! 🪡
Push your needle slowly and steadily. As soon as you see reflux in your syringe 💉, stop right there.
👉 Check the color and flow:
Dark red blood 🩸 + good, smooth reflux = likely vein ✅.
Bright red blood 🔴 or pulsatile flow = likely artery ⚠️ — wrong lane!
Think of it like a traffic signal 🚦: dark red = green light, bright red/pulsating = stop!
🔄 Step 9: Syringe out, needle in! 🪡
🔄 Step 9: Syringe out, needle in! 🪡
Remove the syringe but keep the needle in place.
👉 Observe the blood flow:
Dripping slowly, non-pulsatile 💧 = you’re probably in the vein ✅
Pulsatile flow ❤️💨 = nope, that’s an artery!
Think of it like checking the faucet 🚰: a gentle drip = perfect, a spurt = wrong pipe!
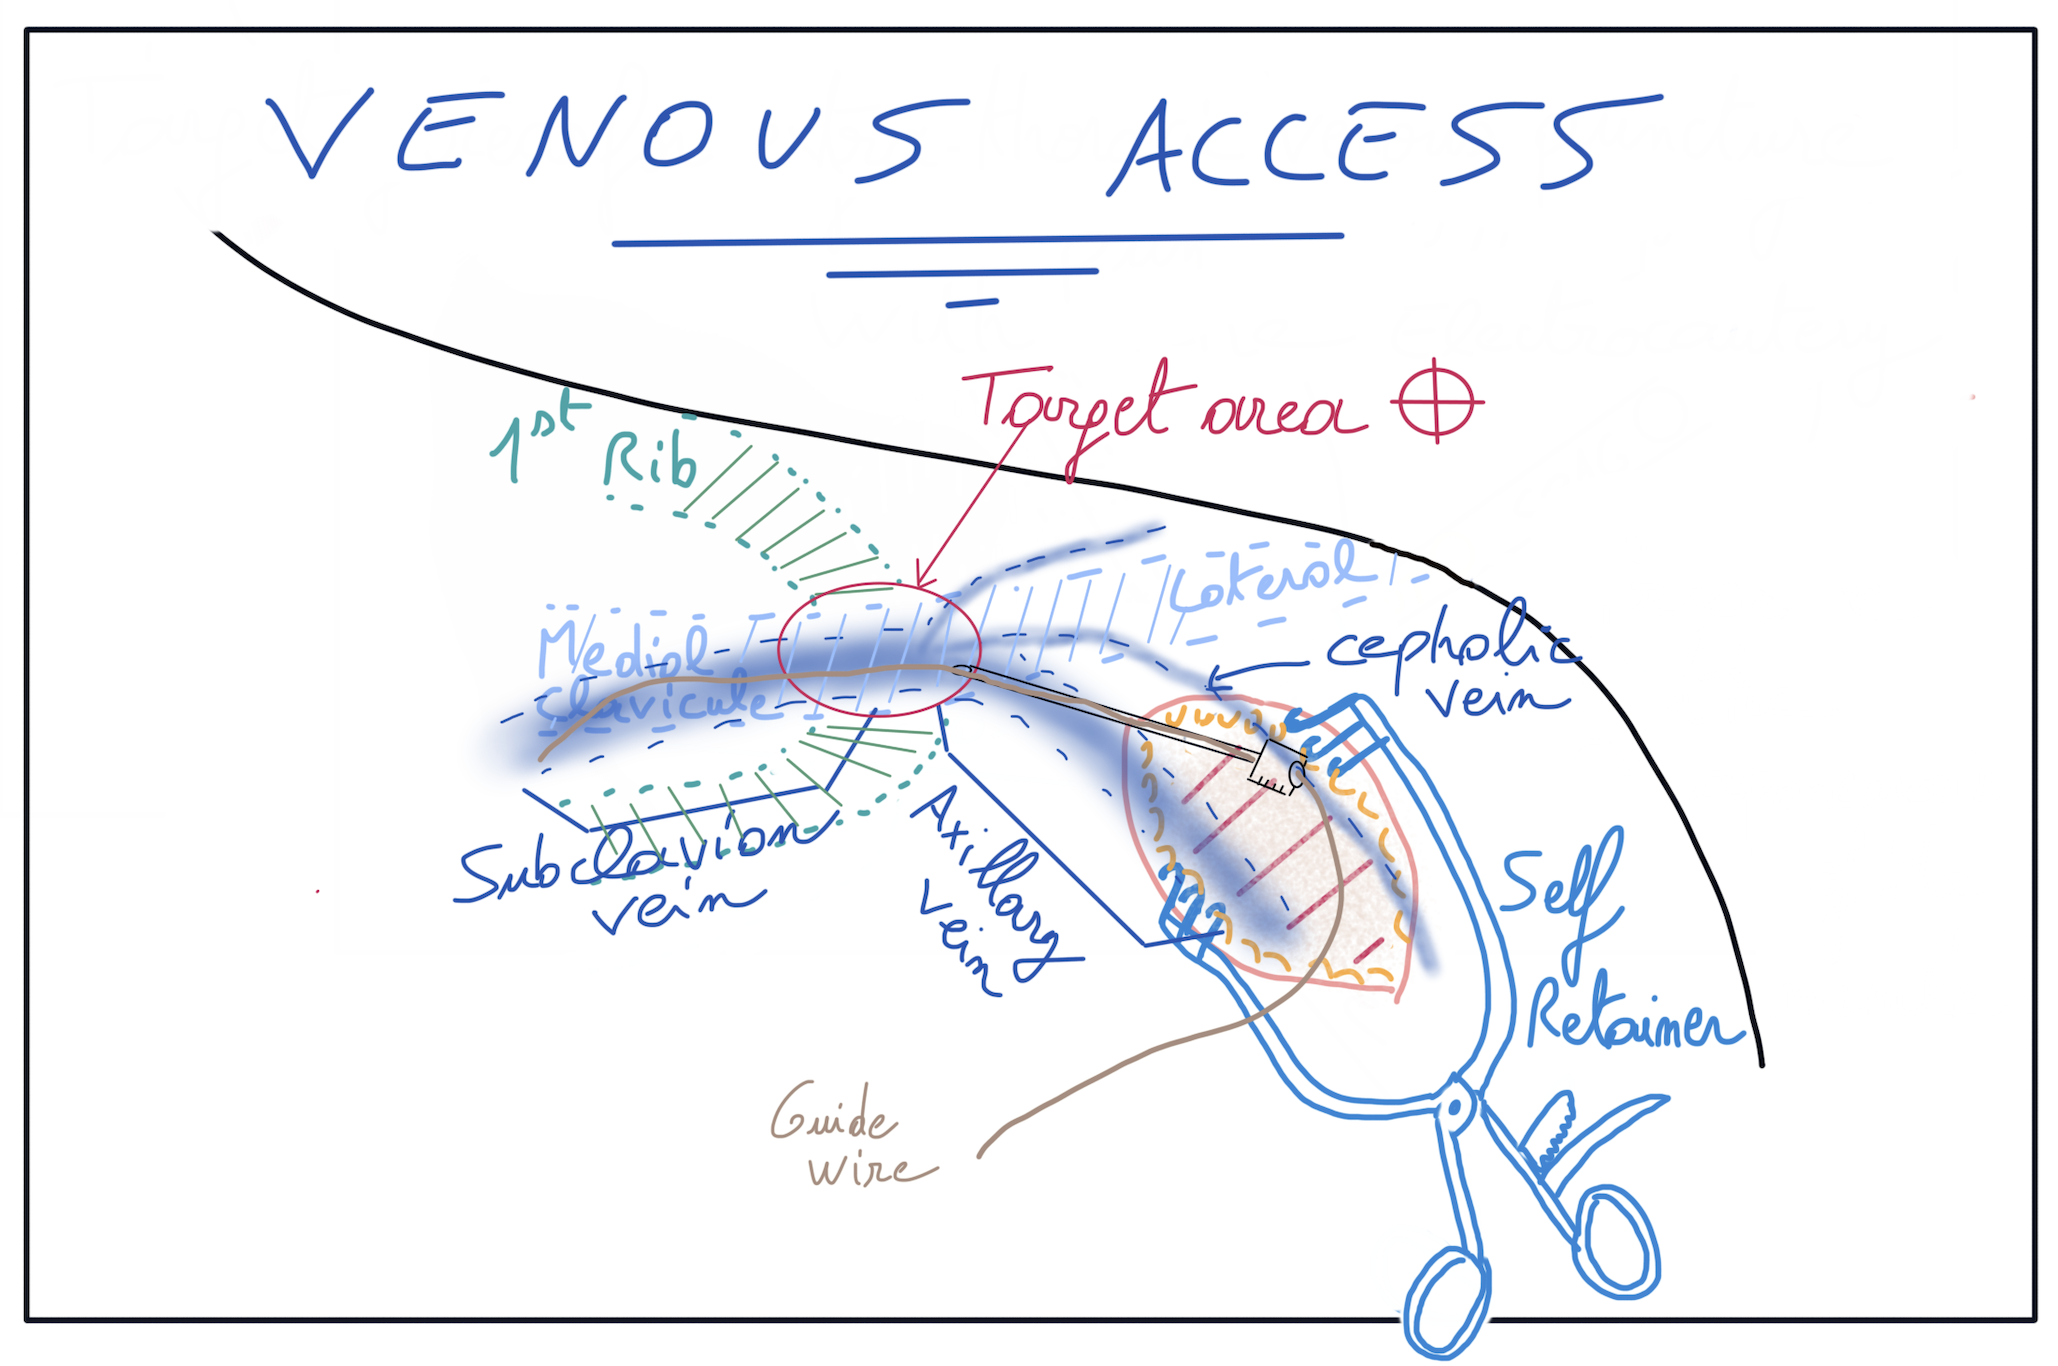
🧵 Step 10: Slide that guidewire! 🪡➡️🧬
🧵 Step 10: Slide that guidewire! 🪡➡️🧬
Carefully pass the guidewire through the needle—gently, no forcing! ✨
👉 If you feel any resistance, stop immediately ⛔ and check your blood flow:
Can you still aspirate? 💉
Yes ✅ → keep going
No ❌ → your needle moved out of the vein! Go back to Step 9 and reassess.
Think of it like threading a delicate rope 🪢 through a tiny tunnel: slow, steady, and always watching your line.
🔍 Step 11: Confirm the vein before dilation! ⚠️
🔍 Step 11: Confirm the vein before dilation! ⚠️
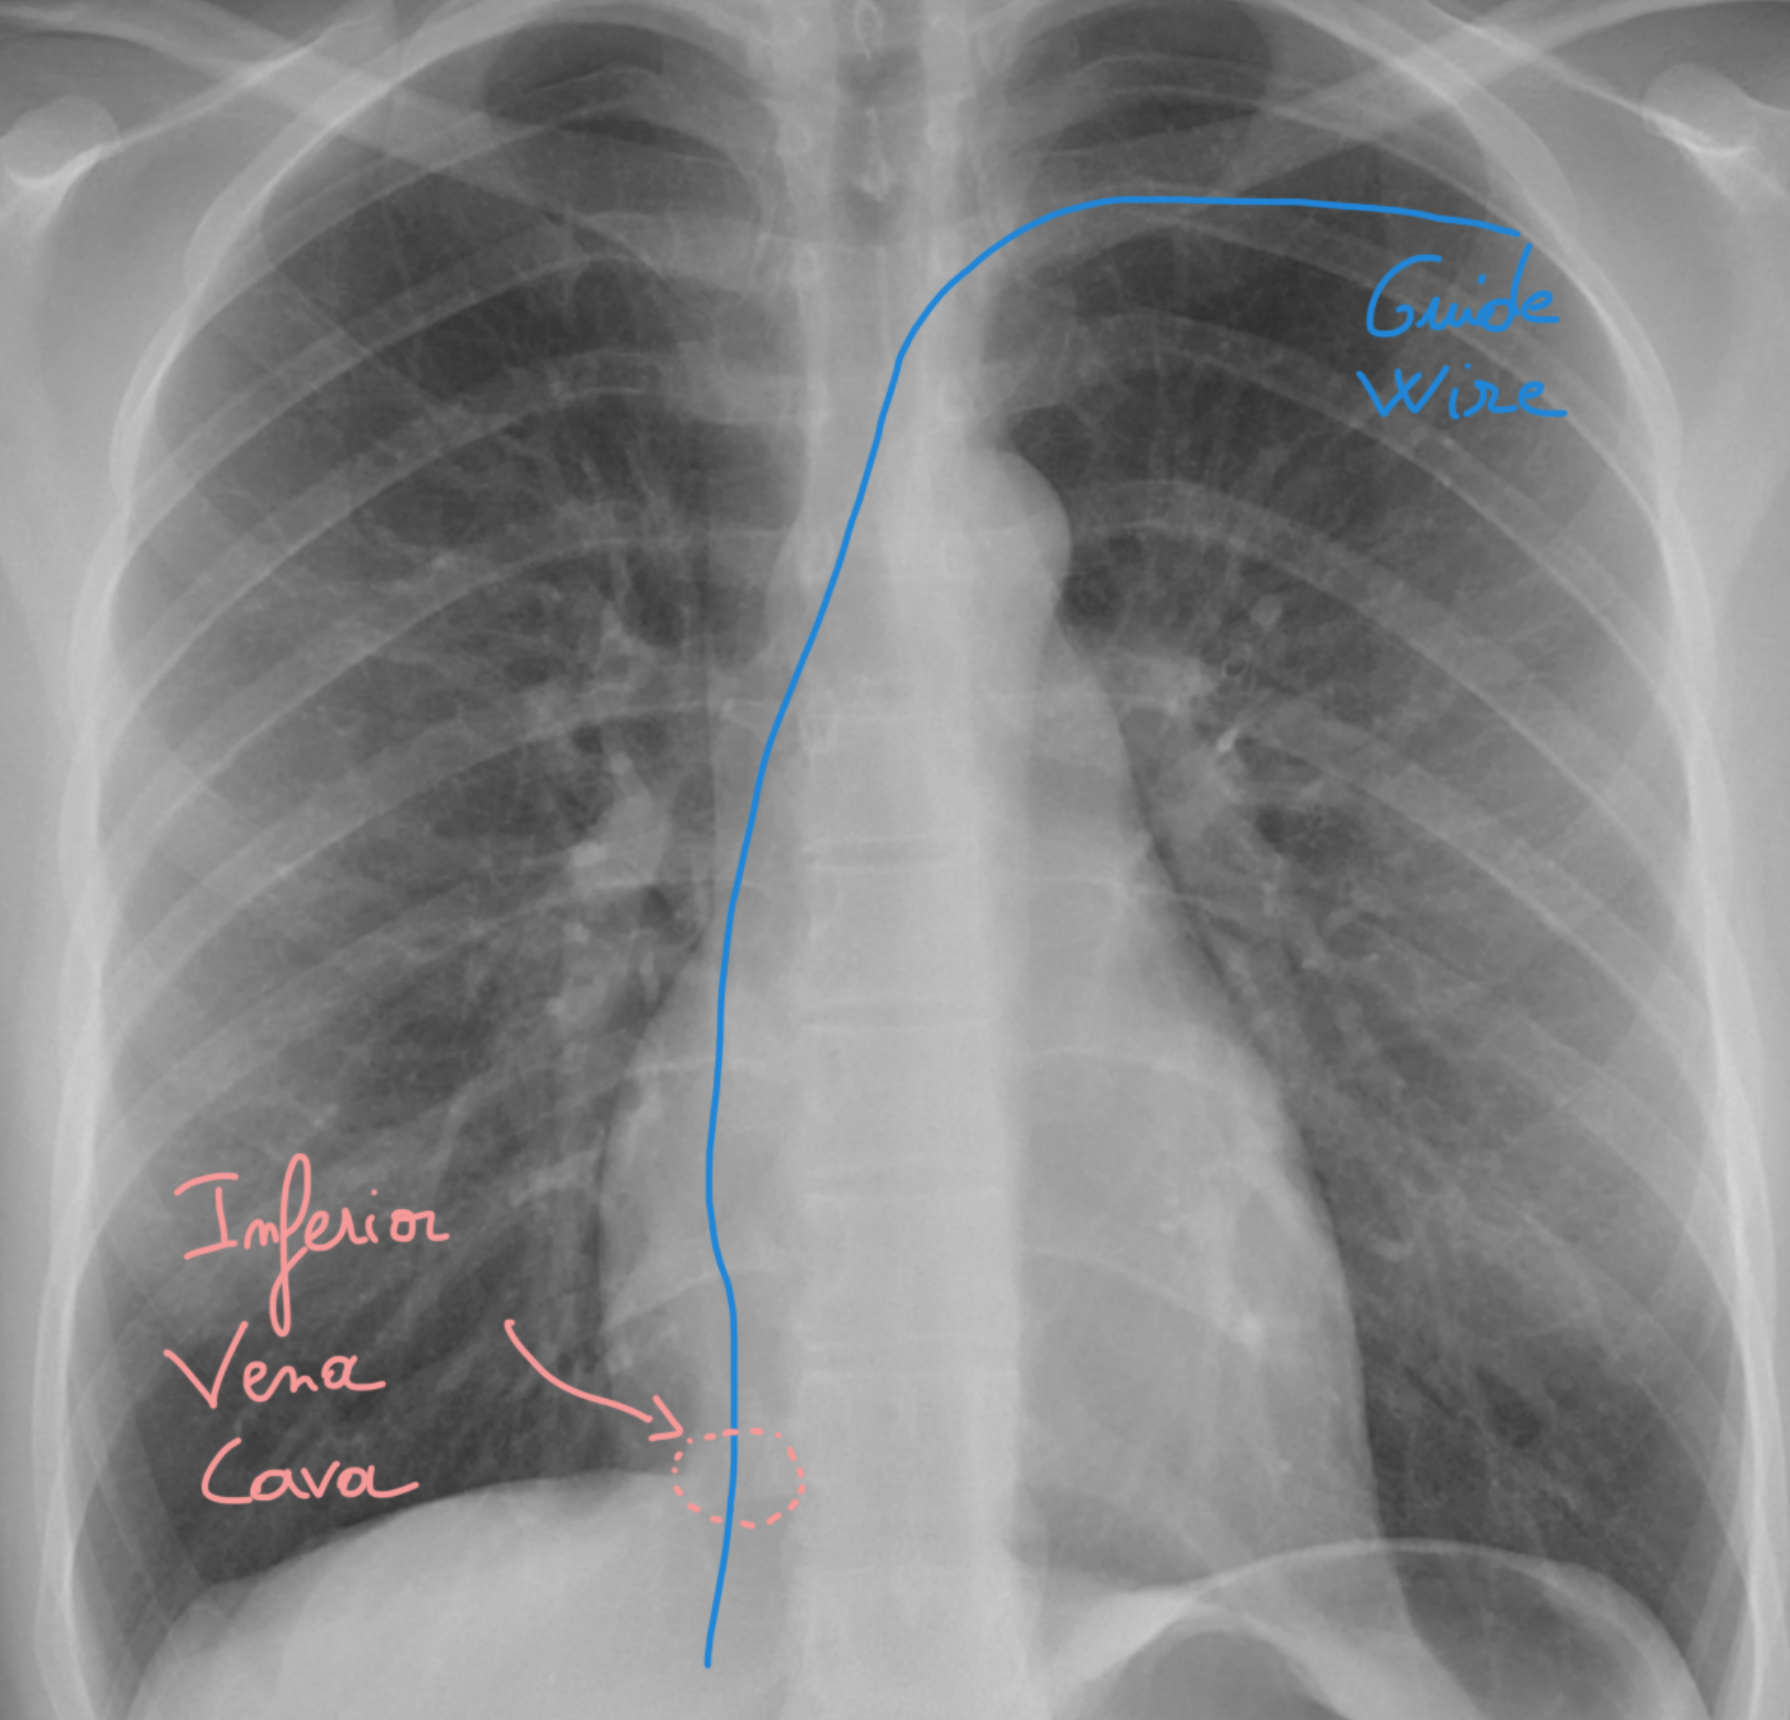
Always check that your needle is heading into the inferior vena cava 🫁⬇️ to be 100% sure you’re in the vein before you start dilating.
🚫 Never dilate if you’re not certain you’re in the vein — this is your golden rule! 🏅
Think of it like checking the GPS 🛰️ before taking a steep downhill road: one wrong turn and it’s trouble!
📦 Step 12: Slide in the sheath! 🪡➡️📦
📦 Step 12: Slide in the sheath! 🪡➡️📦
Gently advance the sheath, dilating the vein slowly — no forcing! ✨
👉 Think of it like opening a tunnel 🚇: smooth, controlled, and respecting the walls. Too much pressure and… ouch! 😅
📈 Step 13: Gently remove the dilator & insert the ventricular lead! 🪡
📈 Step 13: Gently remove the dilator & gently insert the ventricular lead! 🪡➡️🧬
Gently take out the dilator and carefully introduce the ventricular lead into the vein.
👉 Think of it like threading a cable into a tunnel 🛤️ — smooth, precise, and always gently! 😎
🧭 Step 14: Gently advance the ventricular lead! 🪡➡️🧬
🧭 Step 14: Gently advance the ventricular lead! 🪡➡️🧬
Now that your ventricular lead is in, gently and calmly slide it forward until you reach the inferior vena cava 🫁⬇️.
👉 Think of it like navigating a river 🚣♂️: slow, smooth, and always gentle — no rushing!
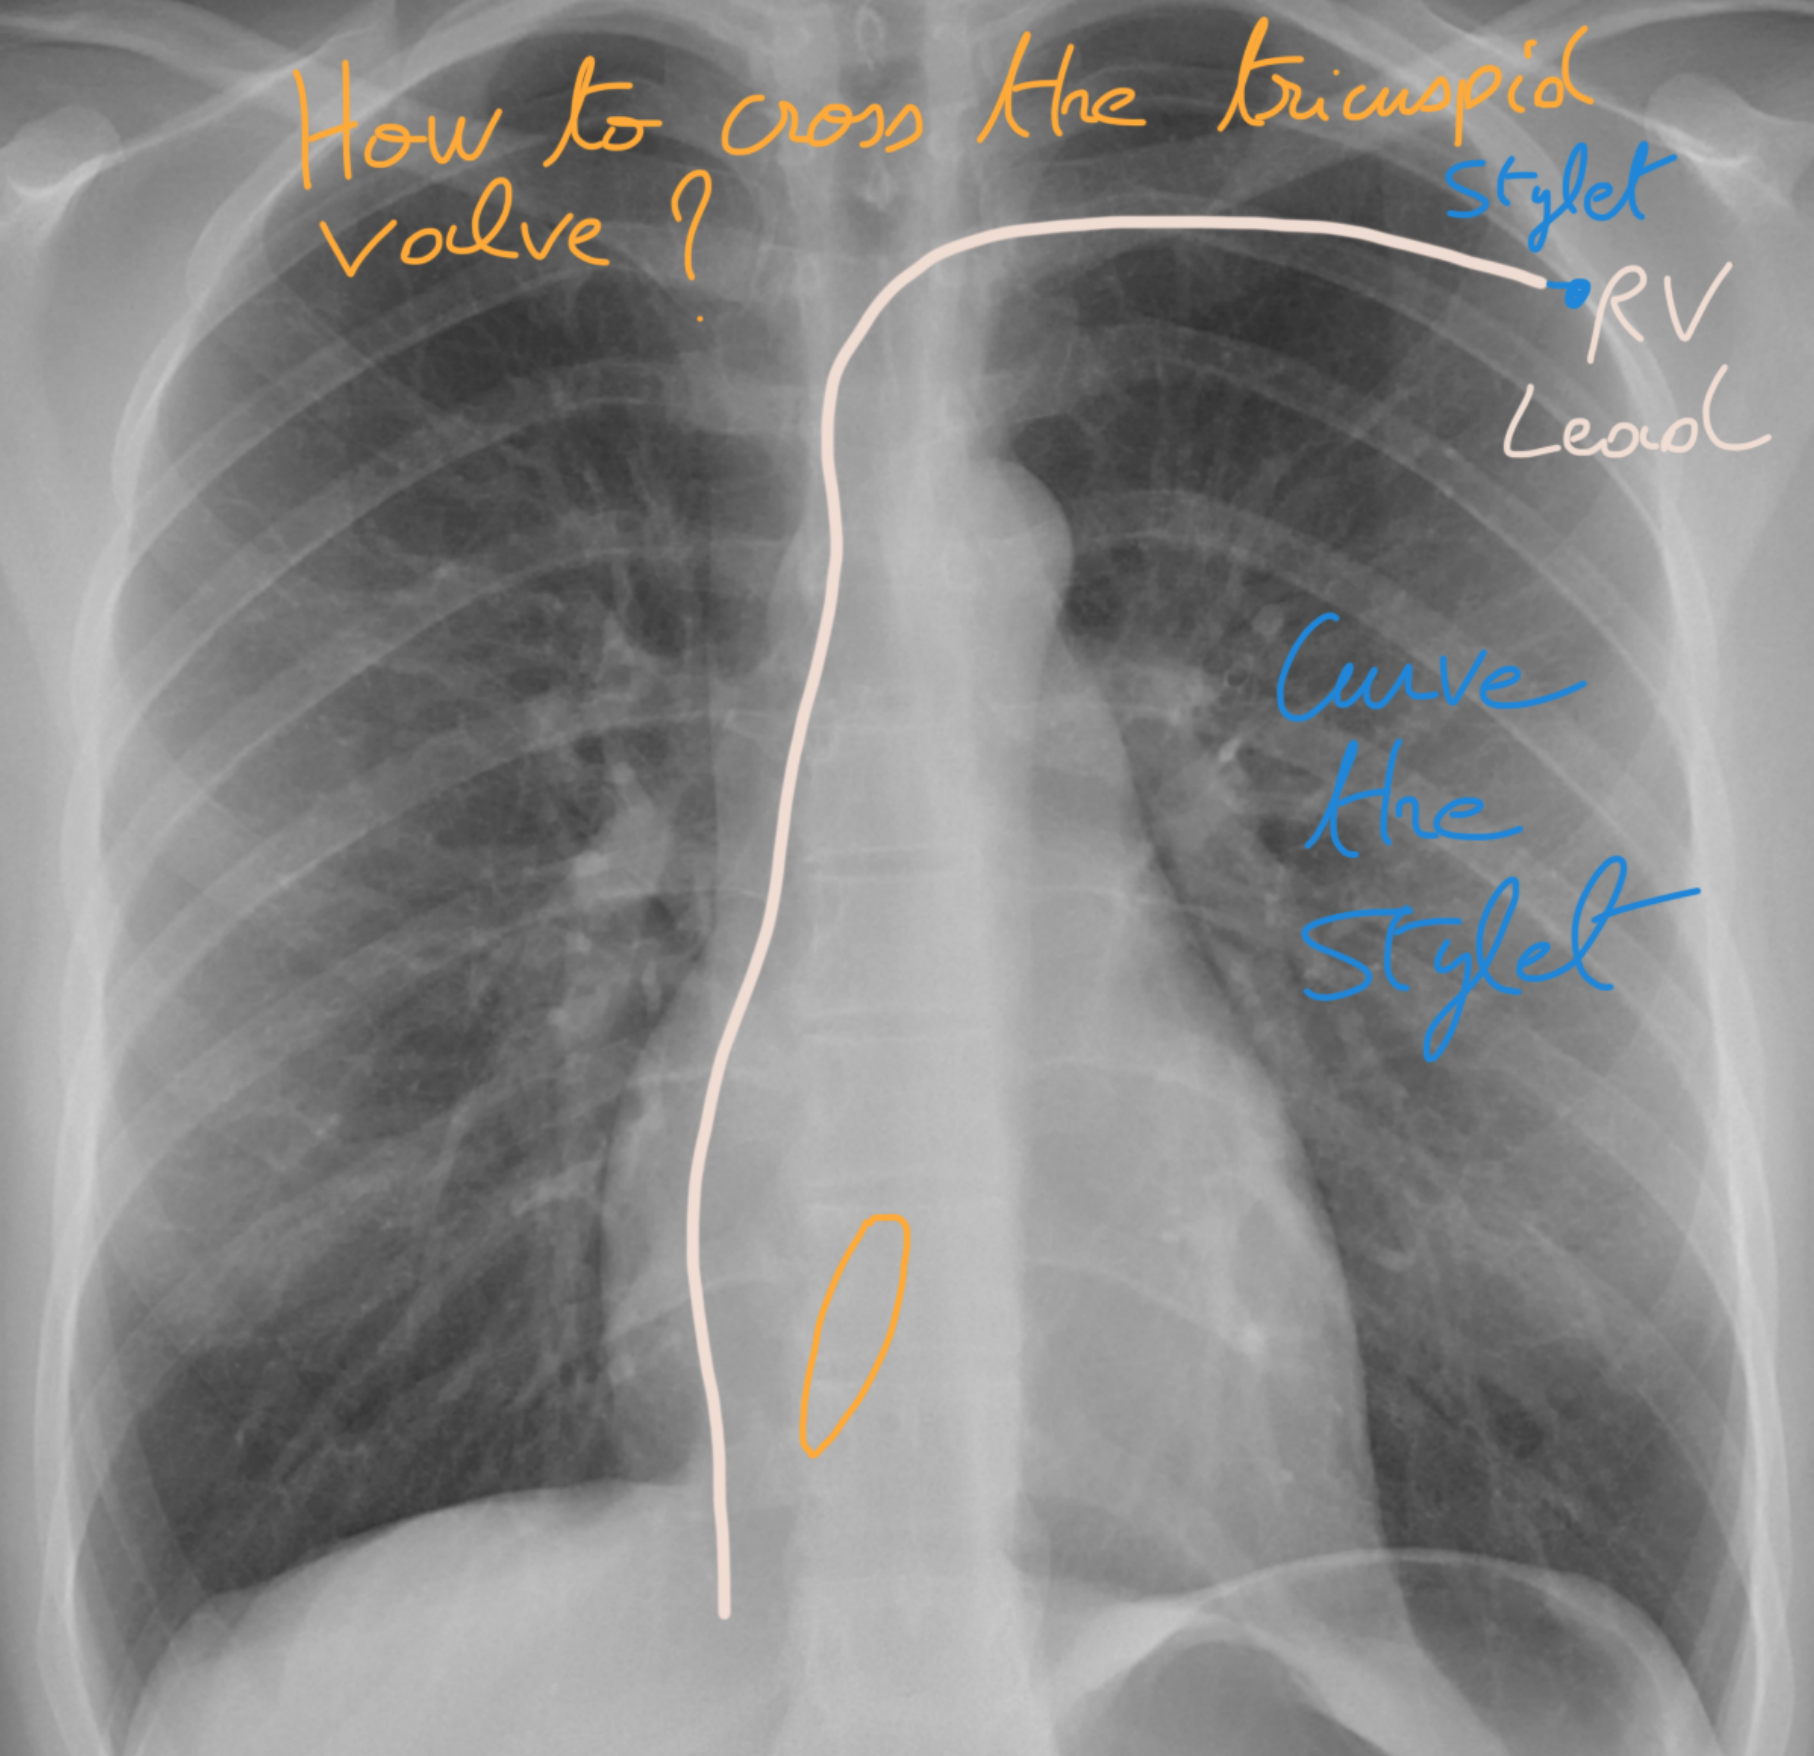
🔄 Step 15: How to cross the tricuspid valve! 🫀🚪
🔄 Step 15: How to cross the tricuspid valve! 🫀🚪
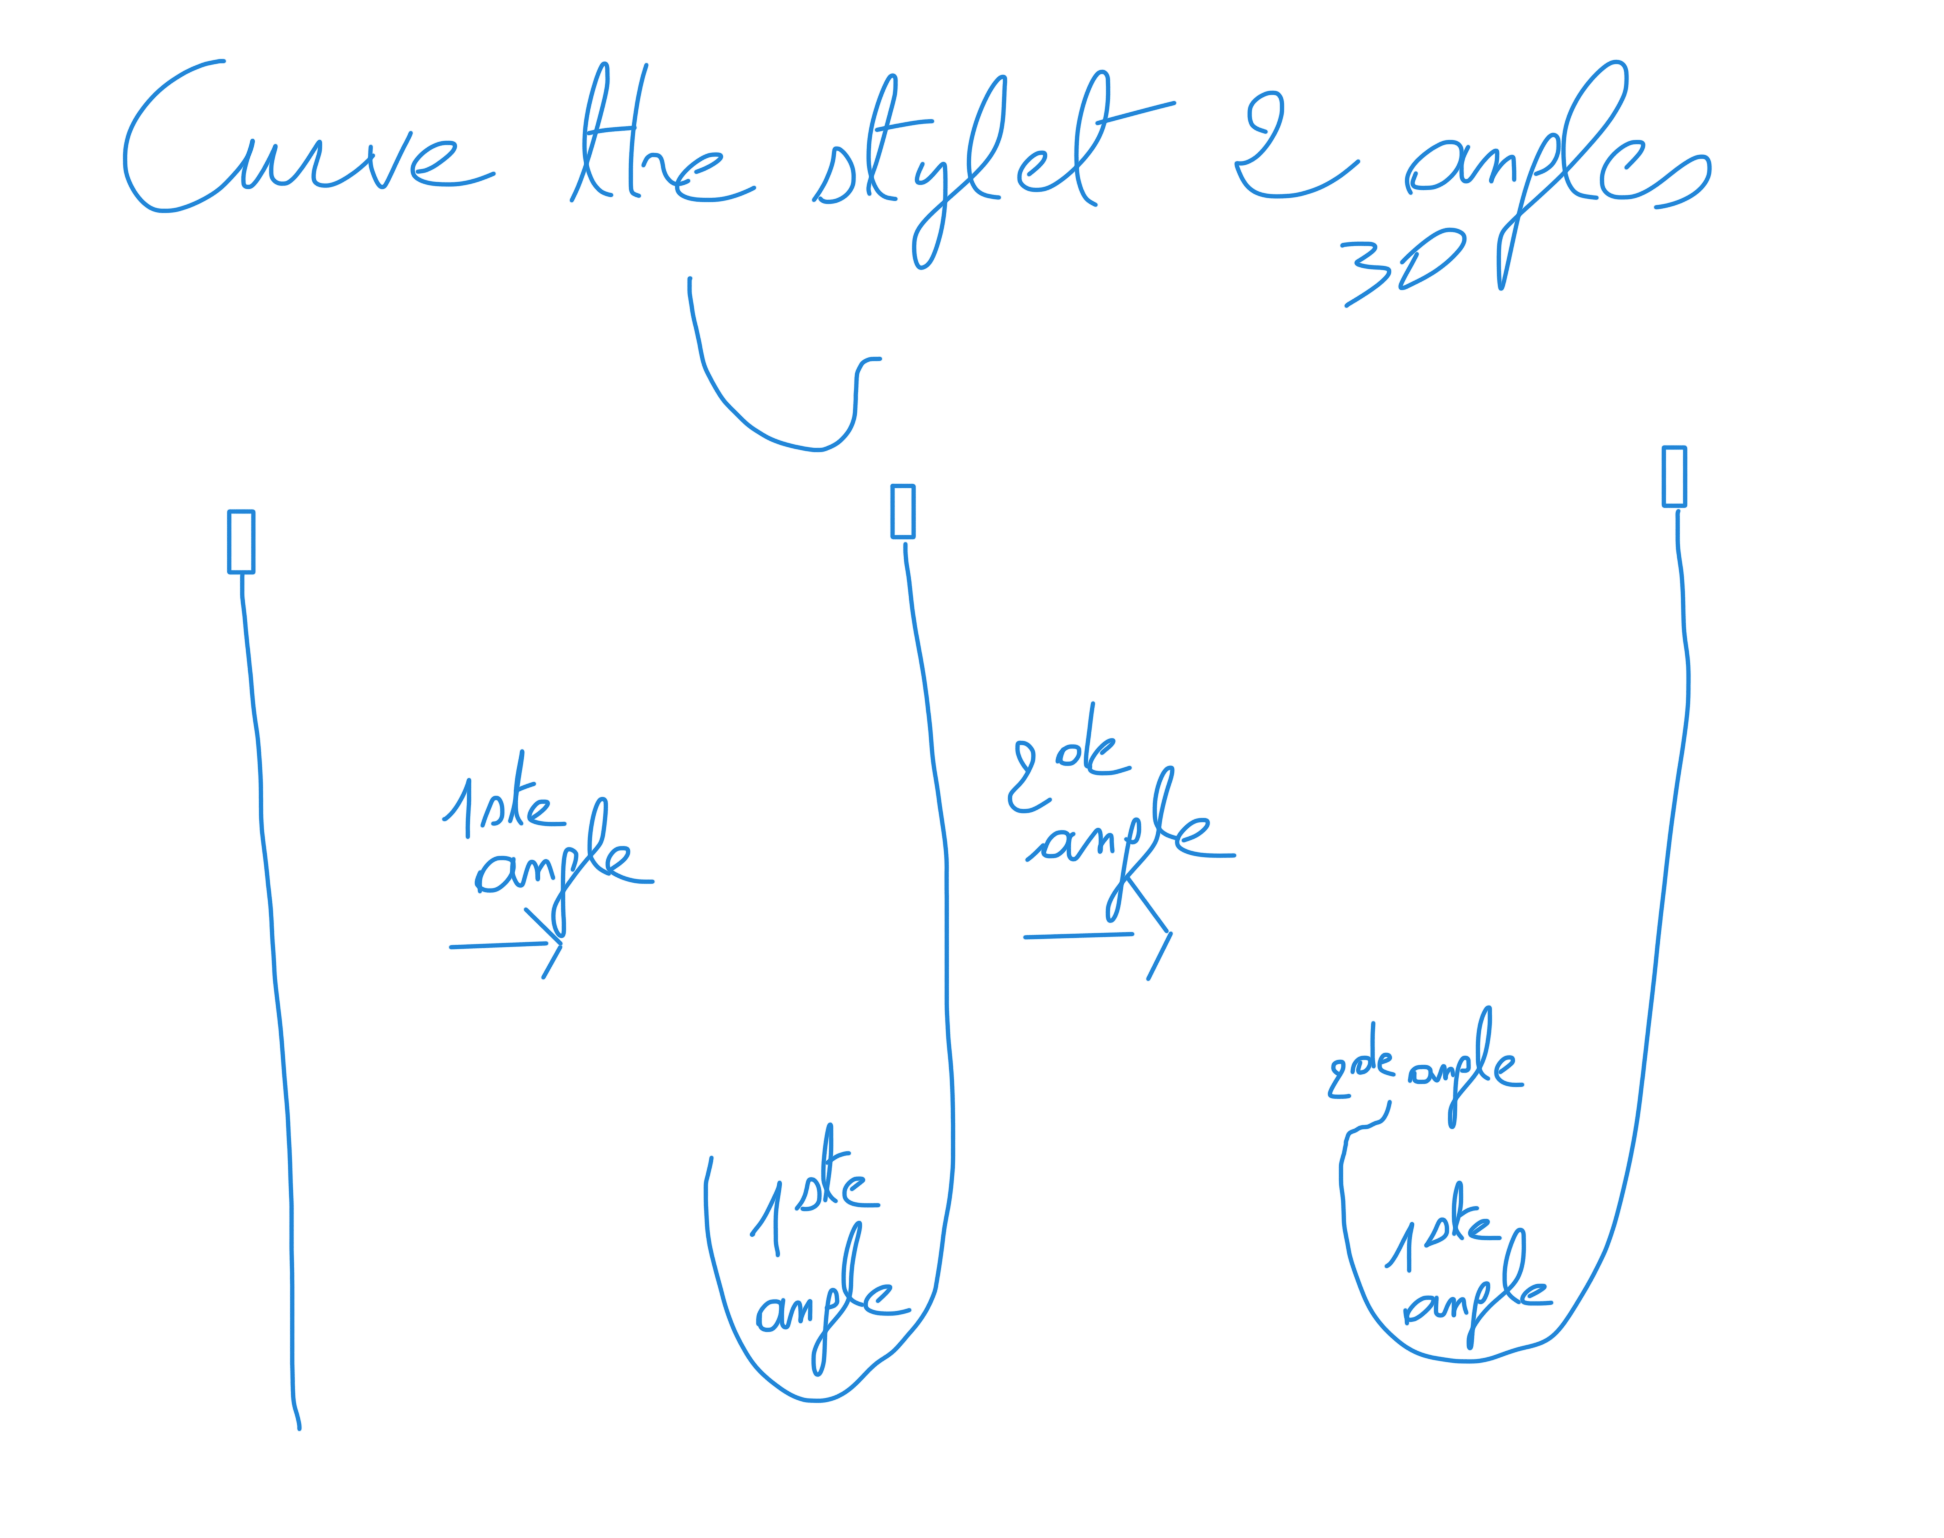
Use the stylet and shape it with two curves:
1️⃣ The first curve along the shaft
2️⃣ The second curve at the tip, like in the 3D diagram 🌀
👉 Think of it like threading a key through a tricky lock 🔑 — precise curves make all the difference!
🌀 Step 16: Securely cross the tricuspid valve! 🚪💪
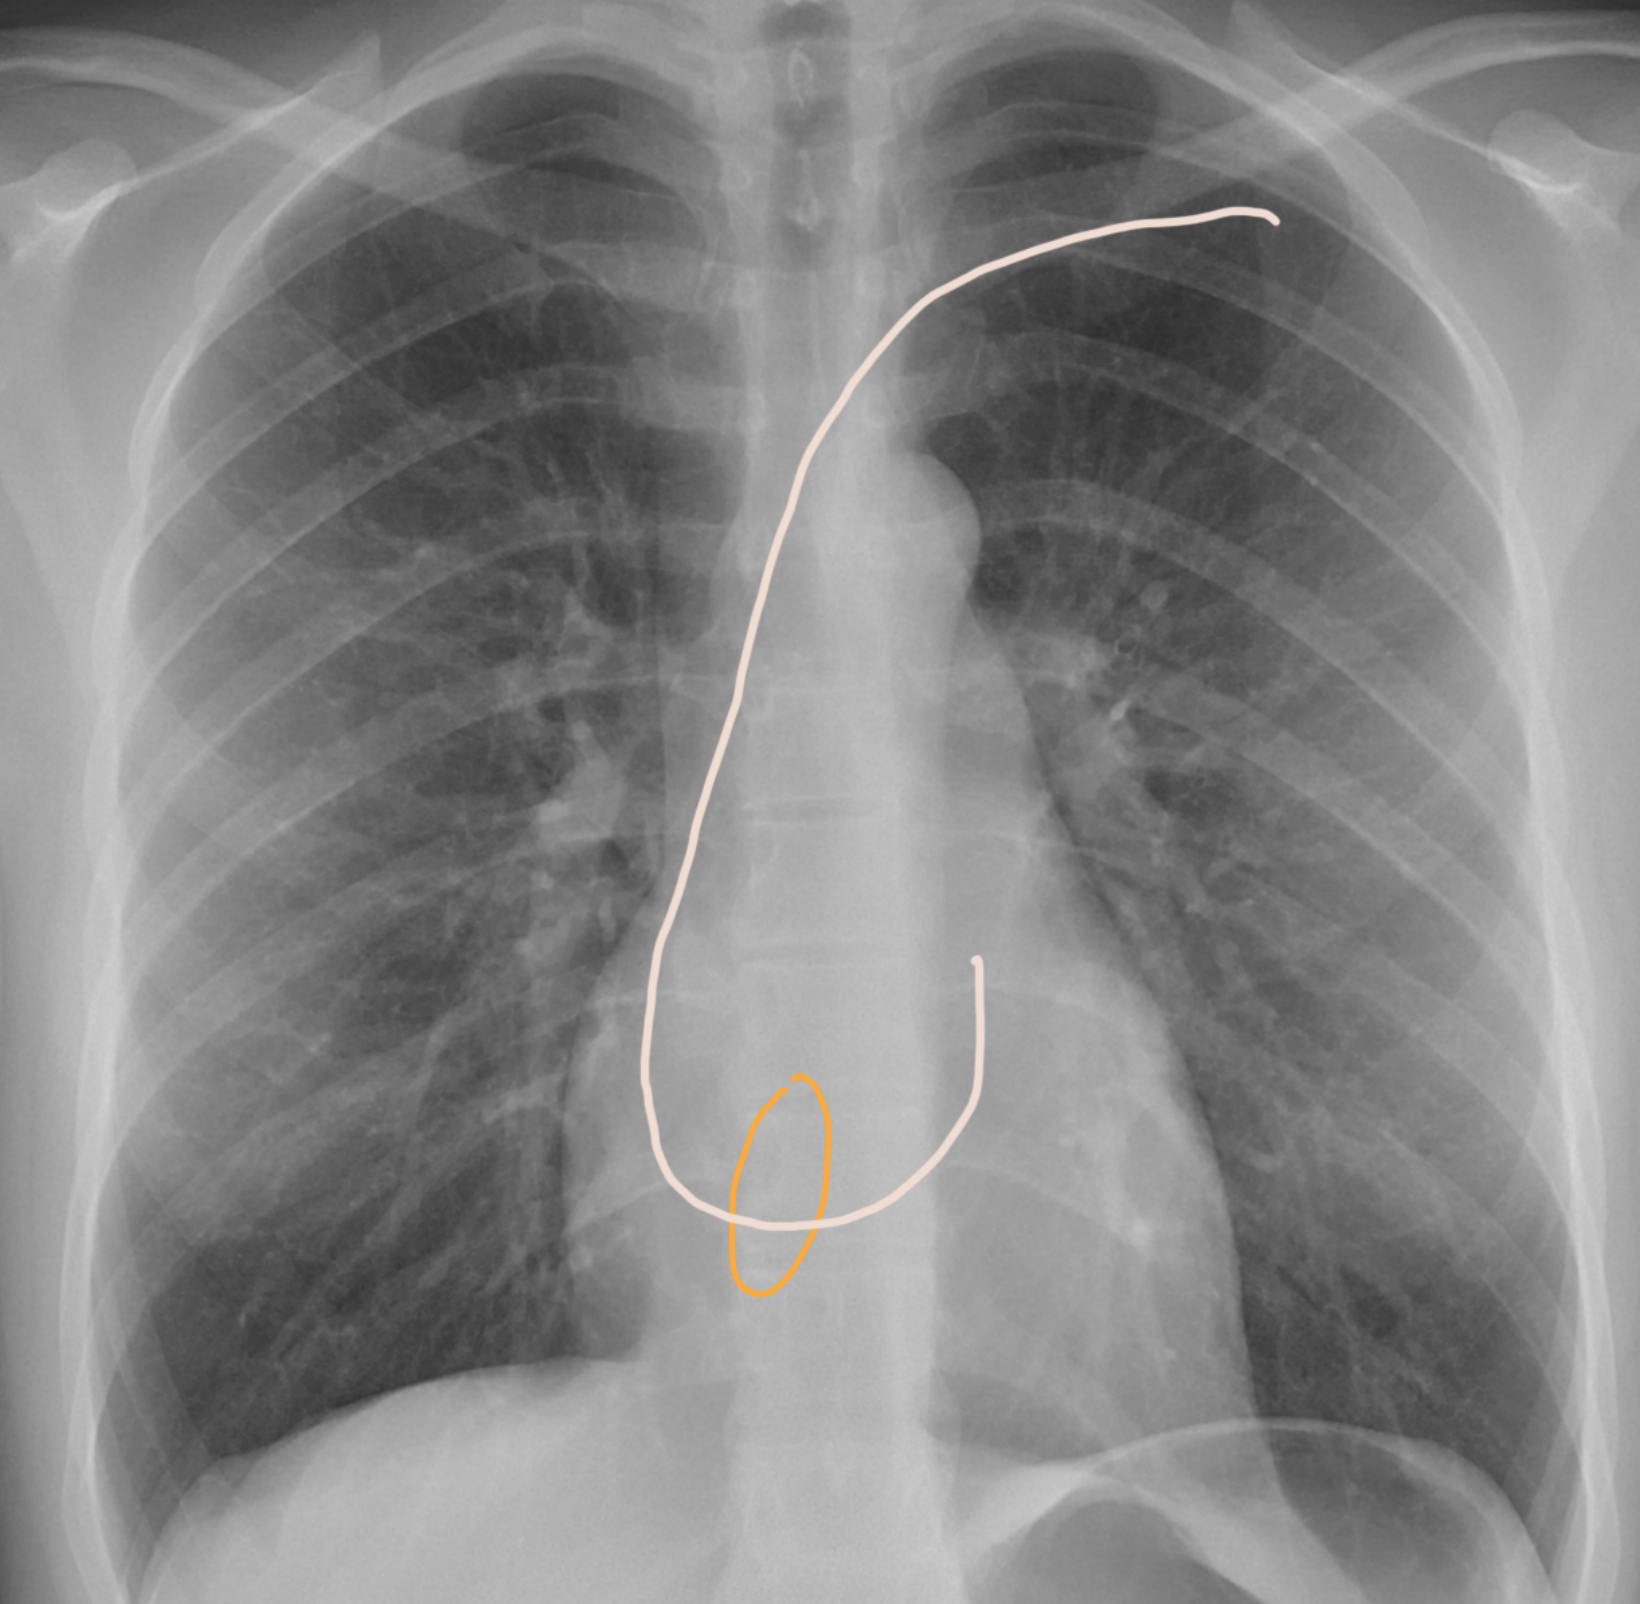
🌀 Step 16: Securely cross the tricuspid valve! 🚪💪
This special stylet curvature lets you safely pass through the tricuspid valve.
👉 A little trick: if you see ventricular extrasystoles ⚡ while advancing, that’s your sign 🟢 — you’re in the ventricle!
Think of it like a secret signal 🎯: your heart is saying, “Yep, you’re in the right place!” ❤️
➡️ Step 17: Straighten the stylet & gently advance to the apex! 🪡📍
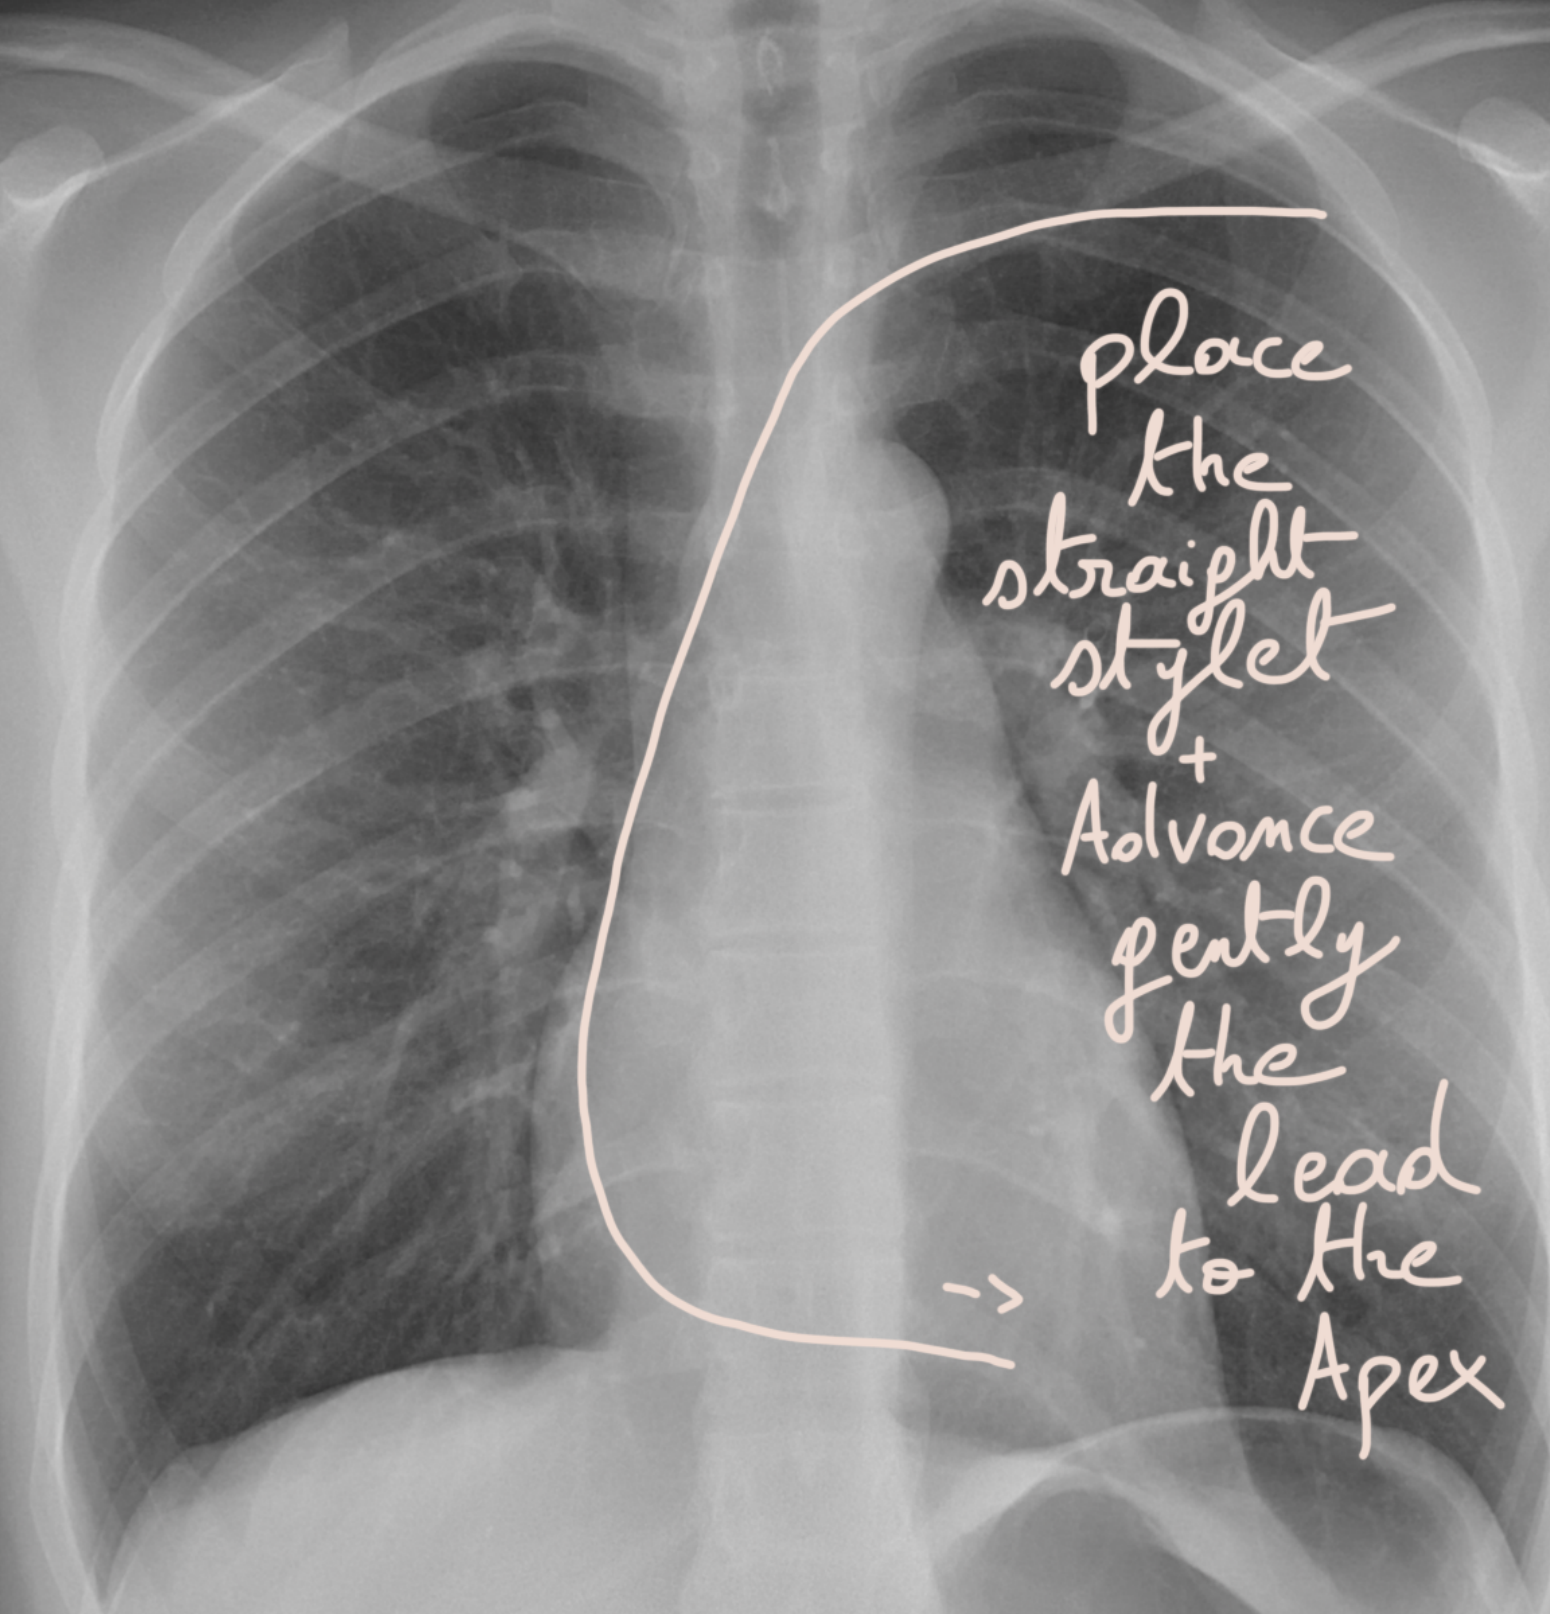
➡️ Step 17: Straighten the stylet & gently advance to the apex! 🪡📍
Now, make the stylet straight and gently push the ventricular lead all the way to the apex of the ventricle.
🚫 Do not push hard! Think of it like sliding a delicate rope into a tube 🪢 — slow, smooth, and always gentle.
📊 Step 18: Check the current of injury! 🔍
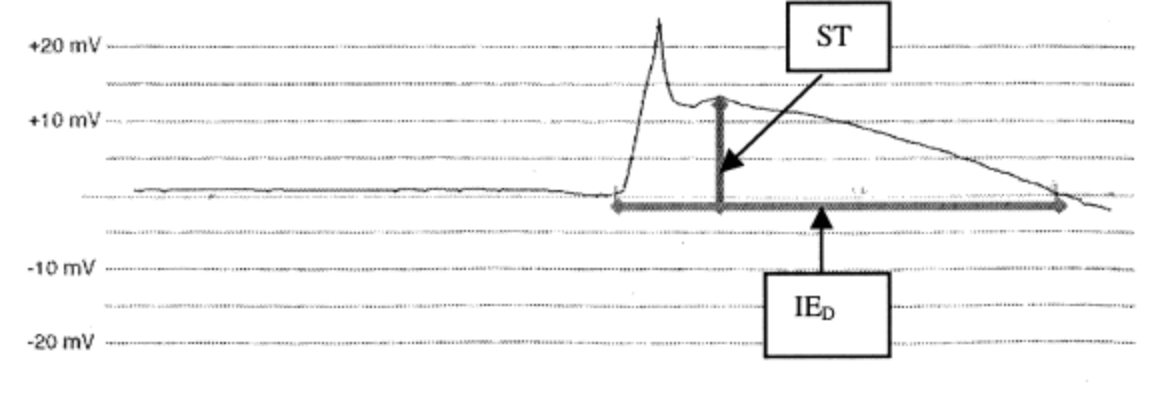
Current of injury predicts adequate active lead fixation in permanent pacemaker/defibrillation leads. Sherry J. Saxonhouse , Jamie B. Conti, Anne B. Curtis. Journal of the American College of Cardiology. Volume 45, Issue 3, 1 February 2005
📊 Step 18: Check the current of injury! 🔍
Once you’ve found the right position for your lead 📍, take a close look at the current of injury ⚡:
👉 The bigger the current of injury, the better ✅ — it’s a good sign for both:
Sensing quality 👂🫀
Threshold reliability 🎯 (even if the threshold is a bit high at the beginning, that’s normal).
Think of it like a “quality stamp” 🏅: the stronger the mark, the safer your lead position!
🔩 Step 19: Lock it in & test! 📊
🔩 Step 19: Lock it in & test! 📊
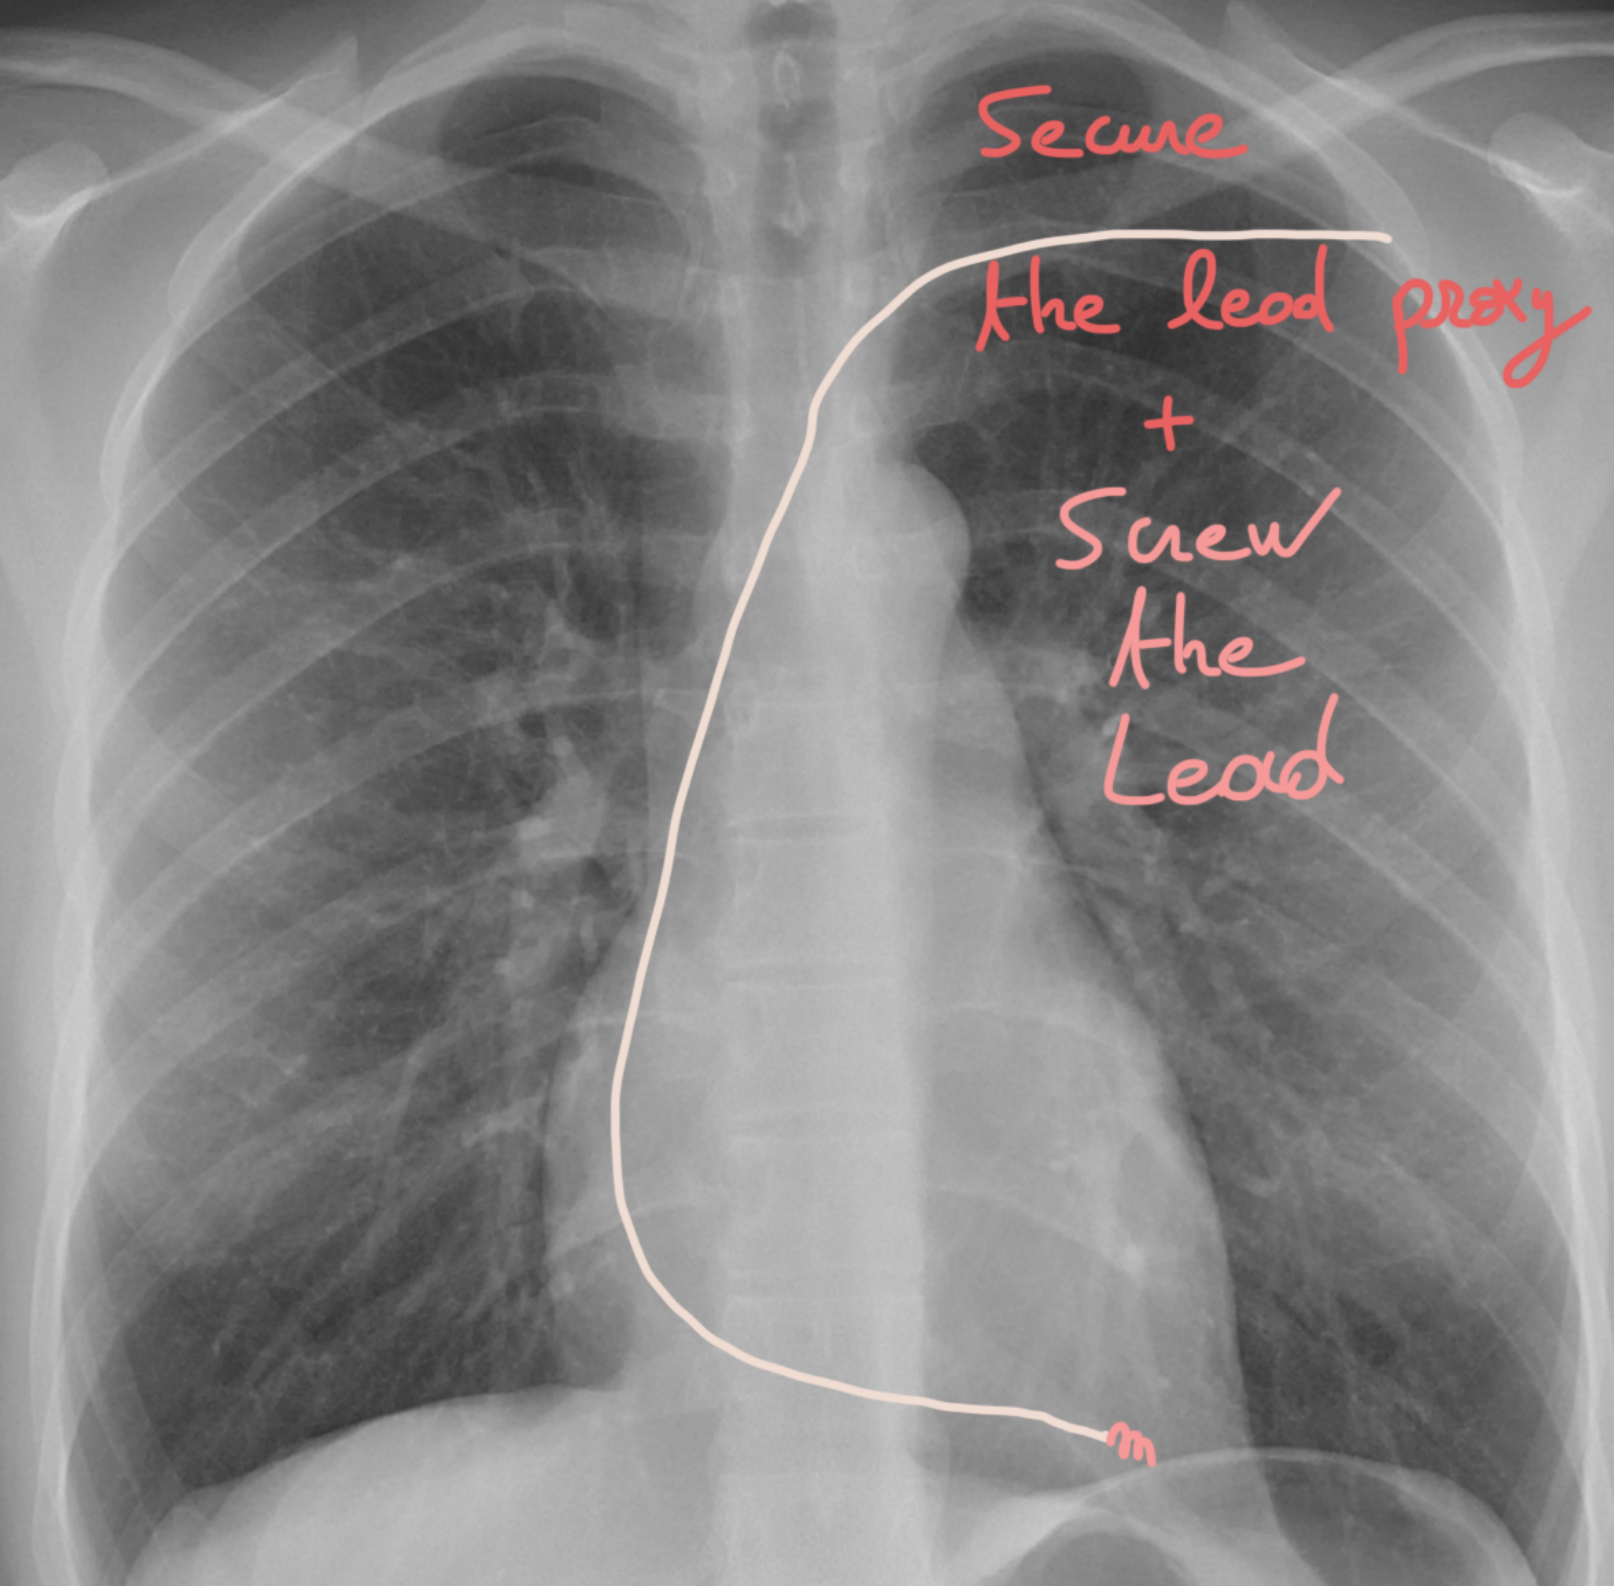
If you’re happy with the current of injury ✅, you can now screw in your lead 🪛.
👉 Then check the key parameters:
Sensing 👂⚡
Threshold 🎯
Impedance 📉
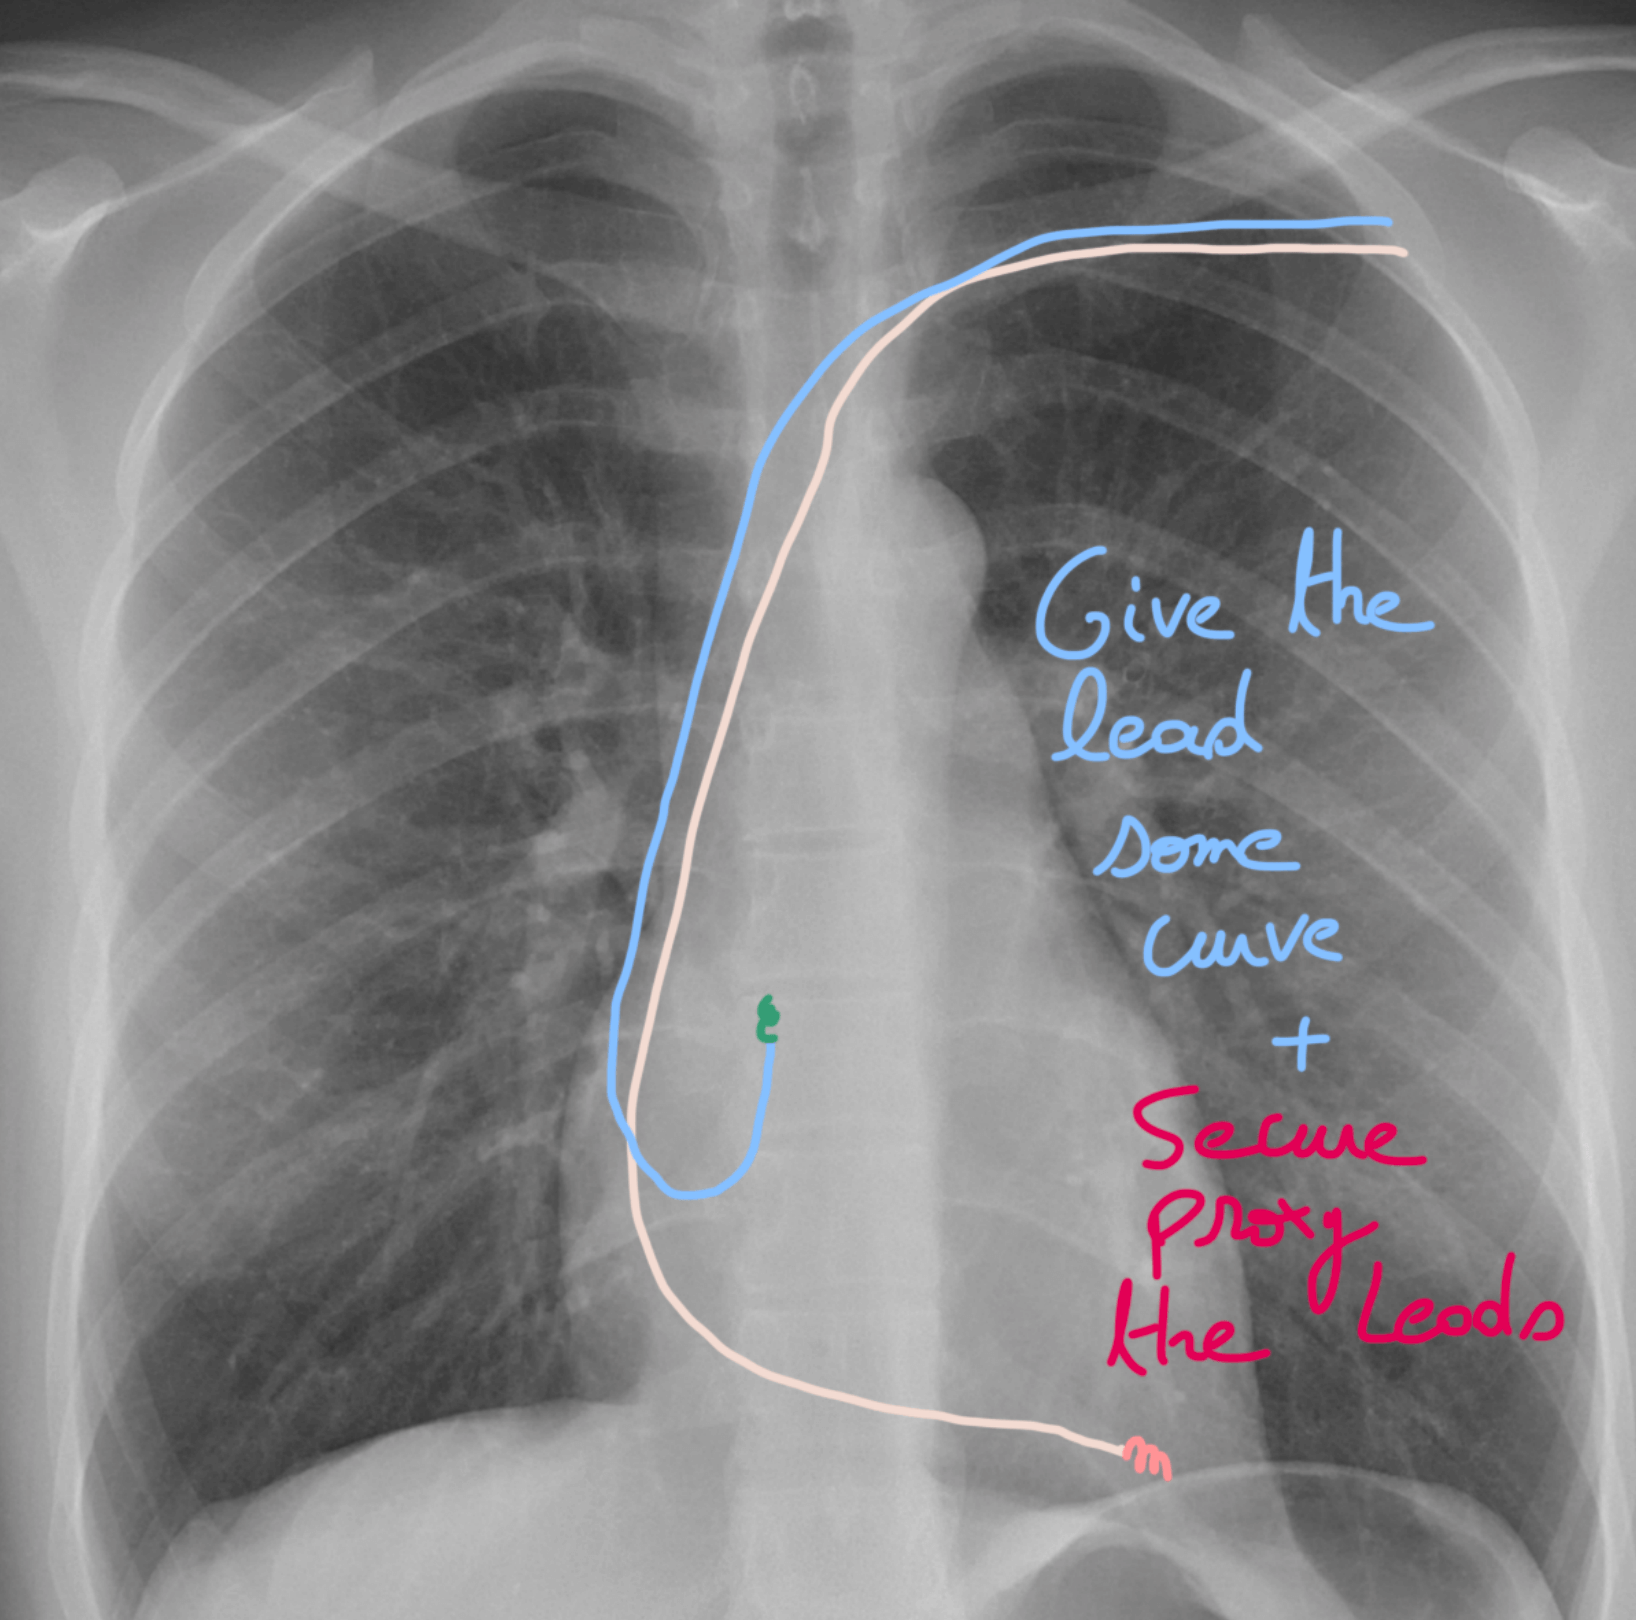
If everything looks good 👍, you can secure the lead proximally so it stays right where it belongs.
Think of it like anchoring your spaceship 🚀 before take-off — stable, safe, and ready to perform!
🎯 Step 20: Time for the atrial lead! 🪡💫
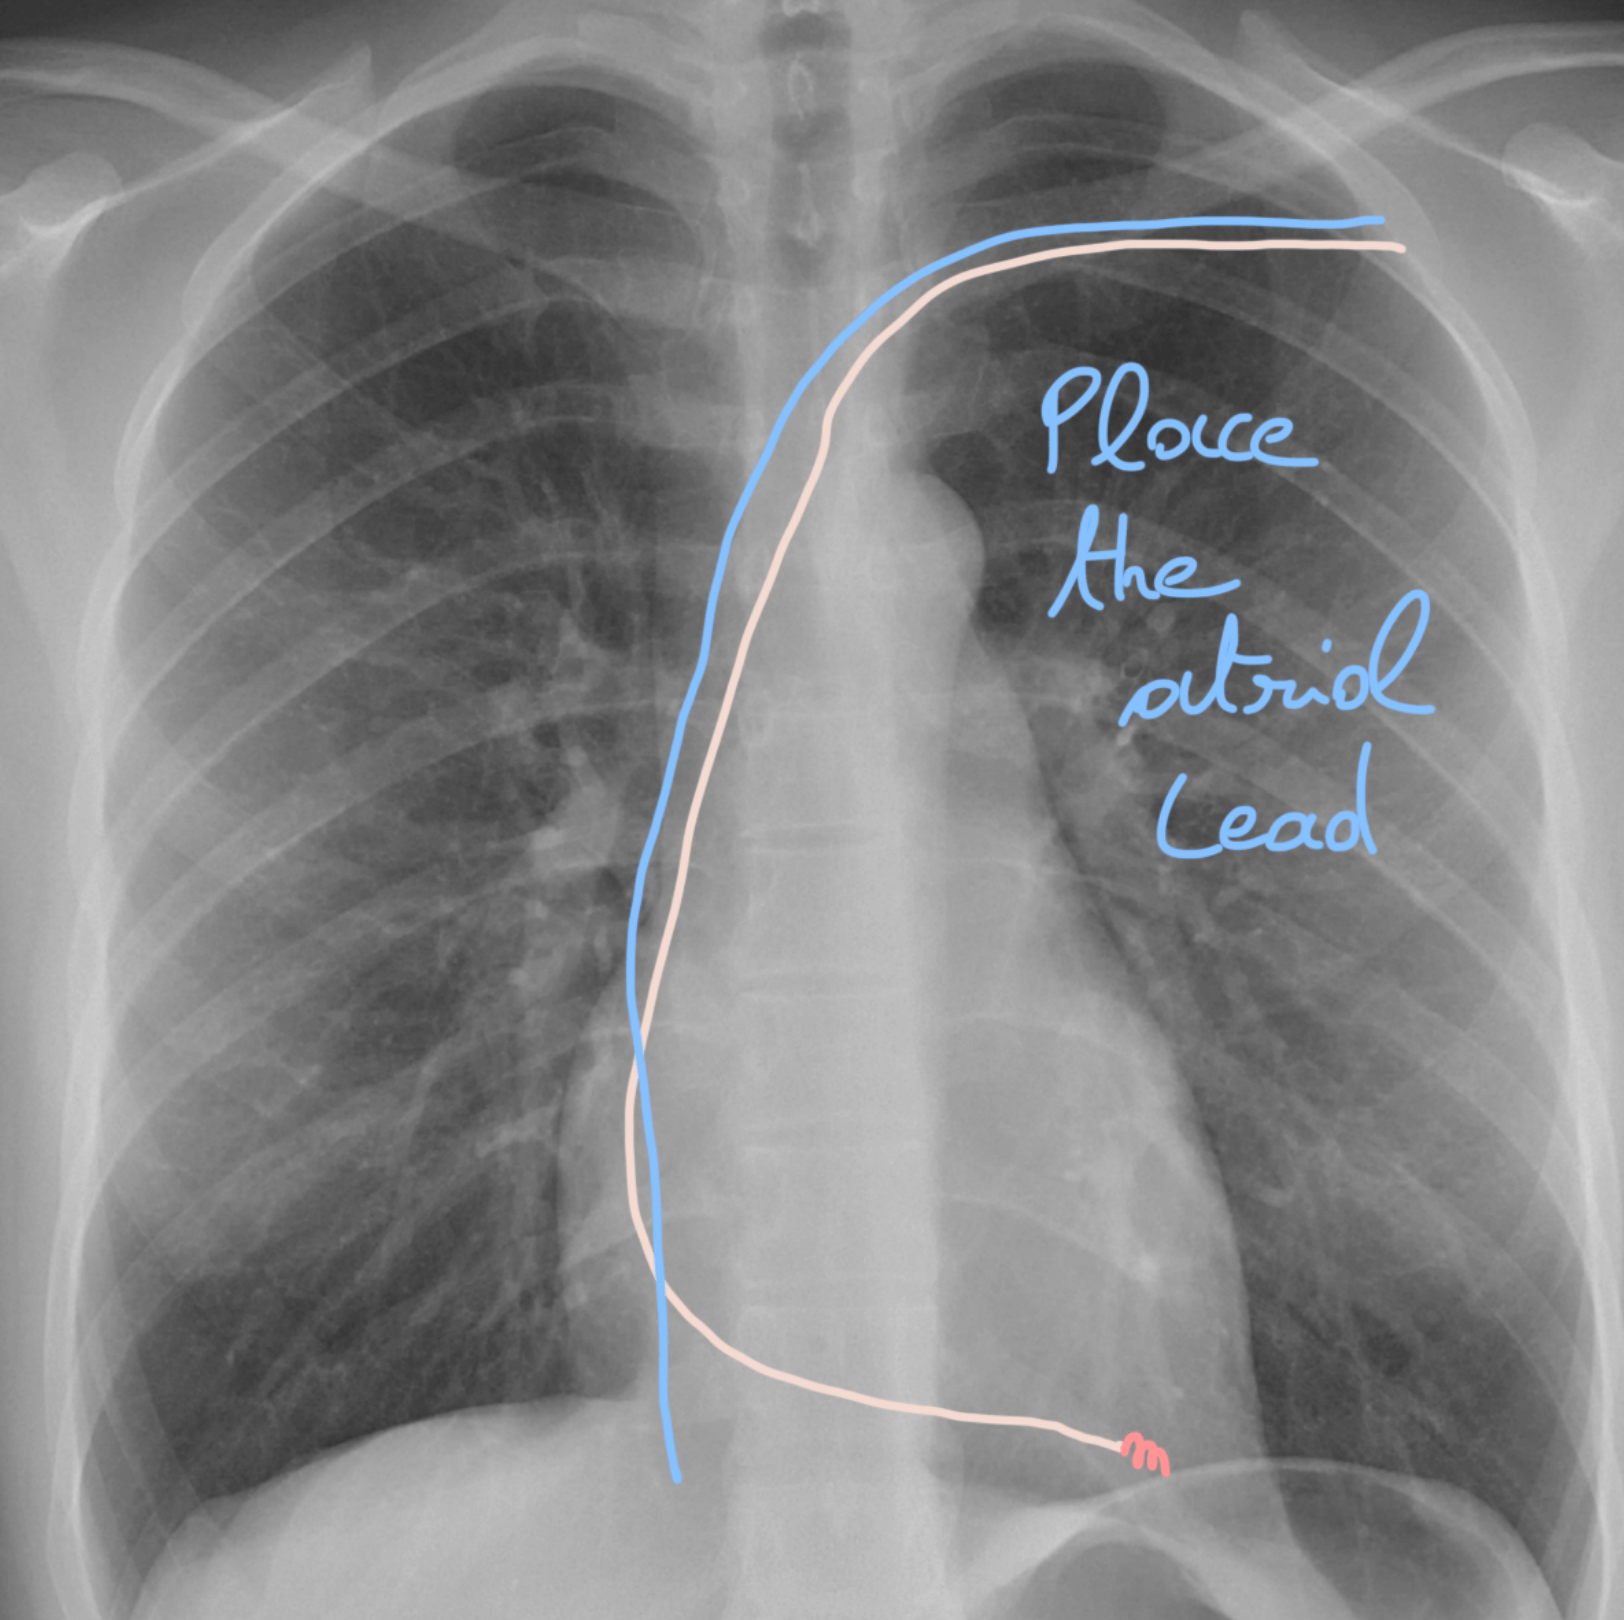
🎯 Step 20: Time for the atrial lead! 🪡💫
Now it’s the atrial lead’s turn. First, guide it into the inferior vena cava ⬇️🫁, then introduce the dedicated atrial stylet🎩.
👉 Think of it like switching tools in a video game 🎮: new level, new weapon, same precision!
🎣 Step 21: Hook the right atrial appendage! 🪡💫
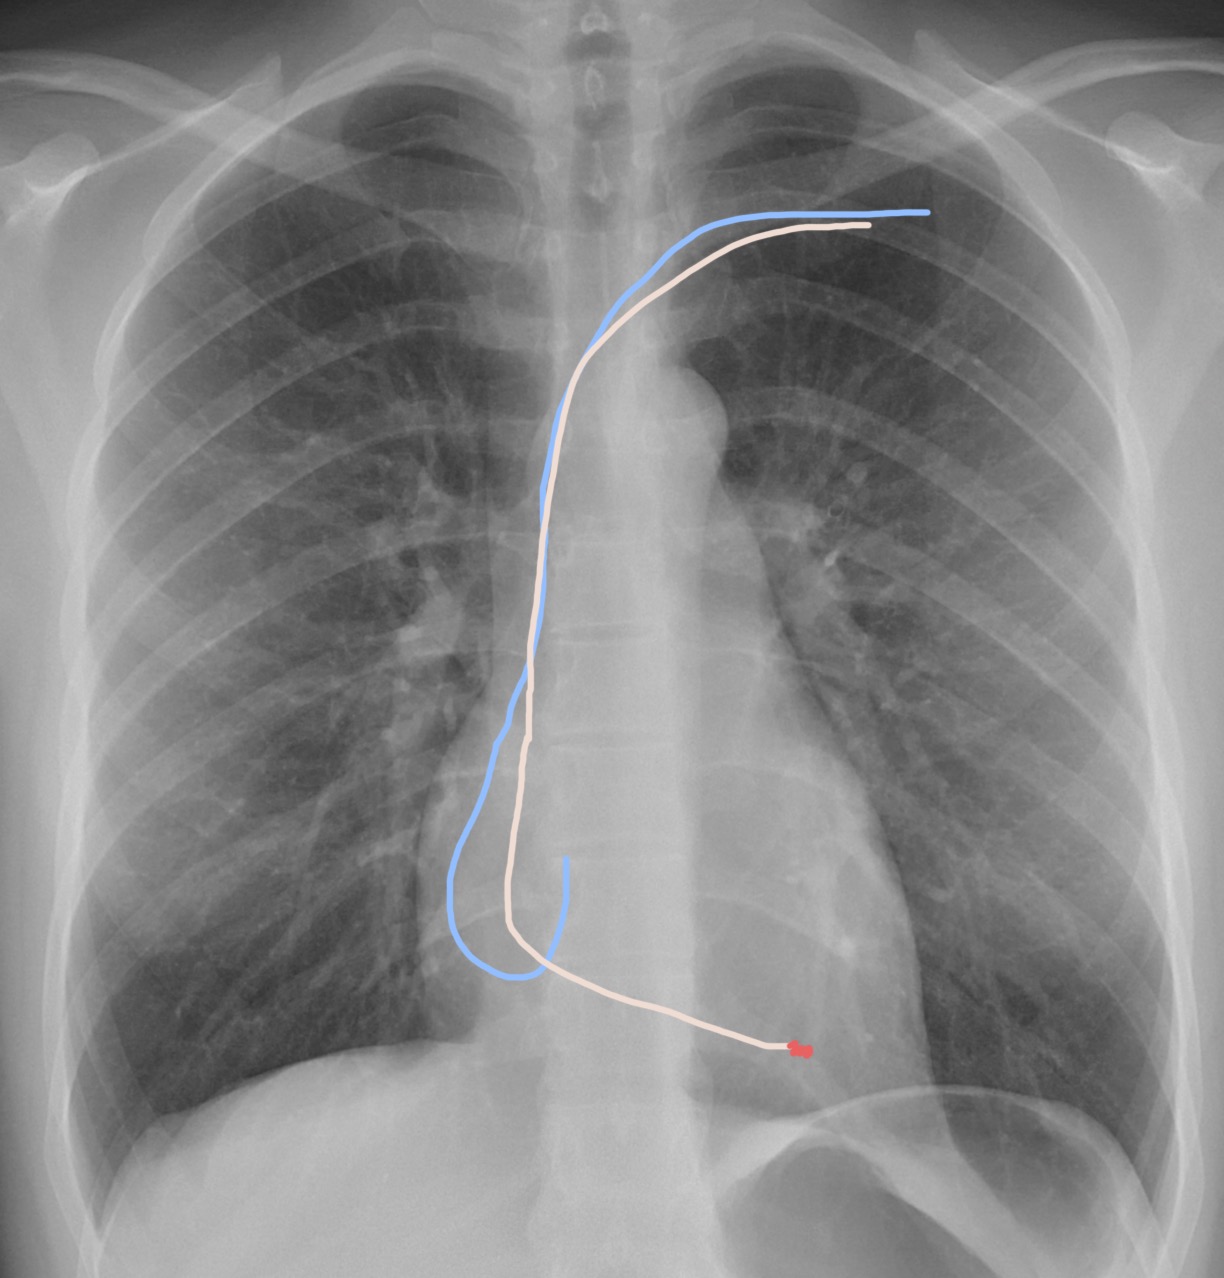
🎣 Step 21: Hook the right atrial appendage! 🪡💫
With the atrial stylet, your lead will take on a hook shape.
👉 The goal? To catch the right atrial appendage (RAA) 🫀 like a skilled fisherman reeling in the perfect catch 🐟.
Think of it as casting your line 🎯: patience, precision, and a gentle hand always win!
🌀 Step 22: Catch & screw the atrial lead! 🎯
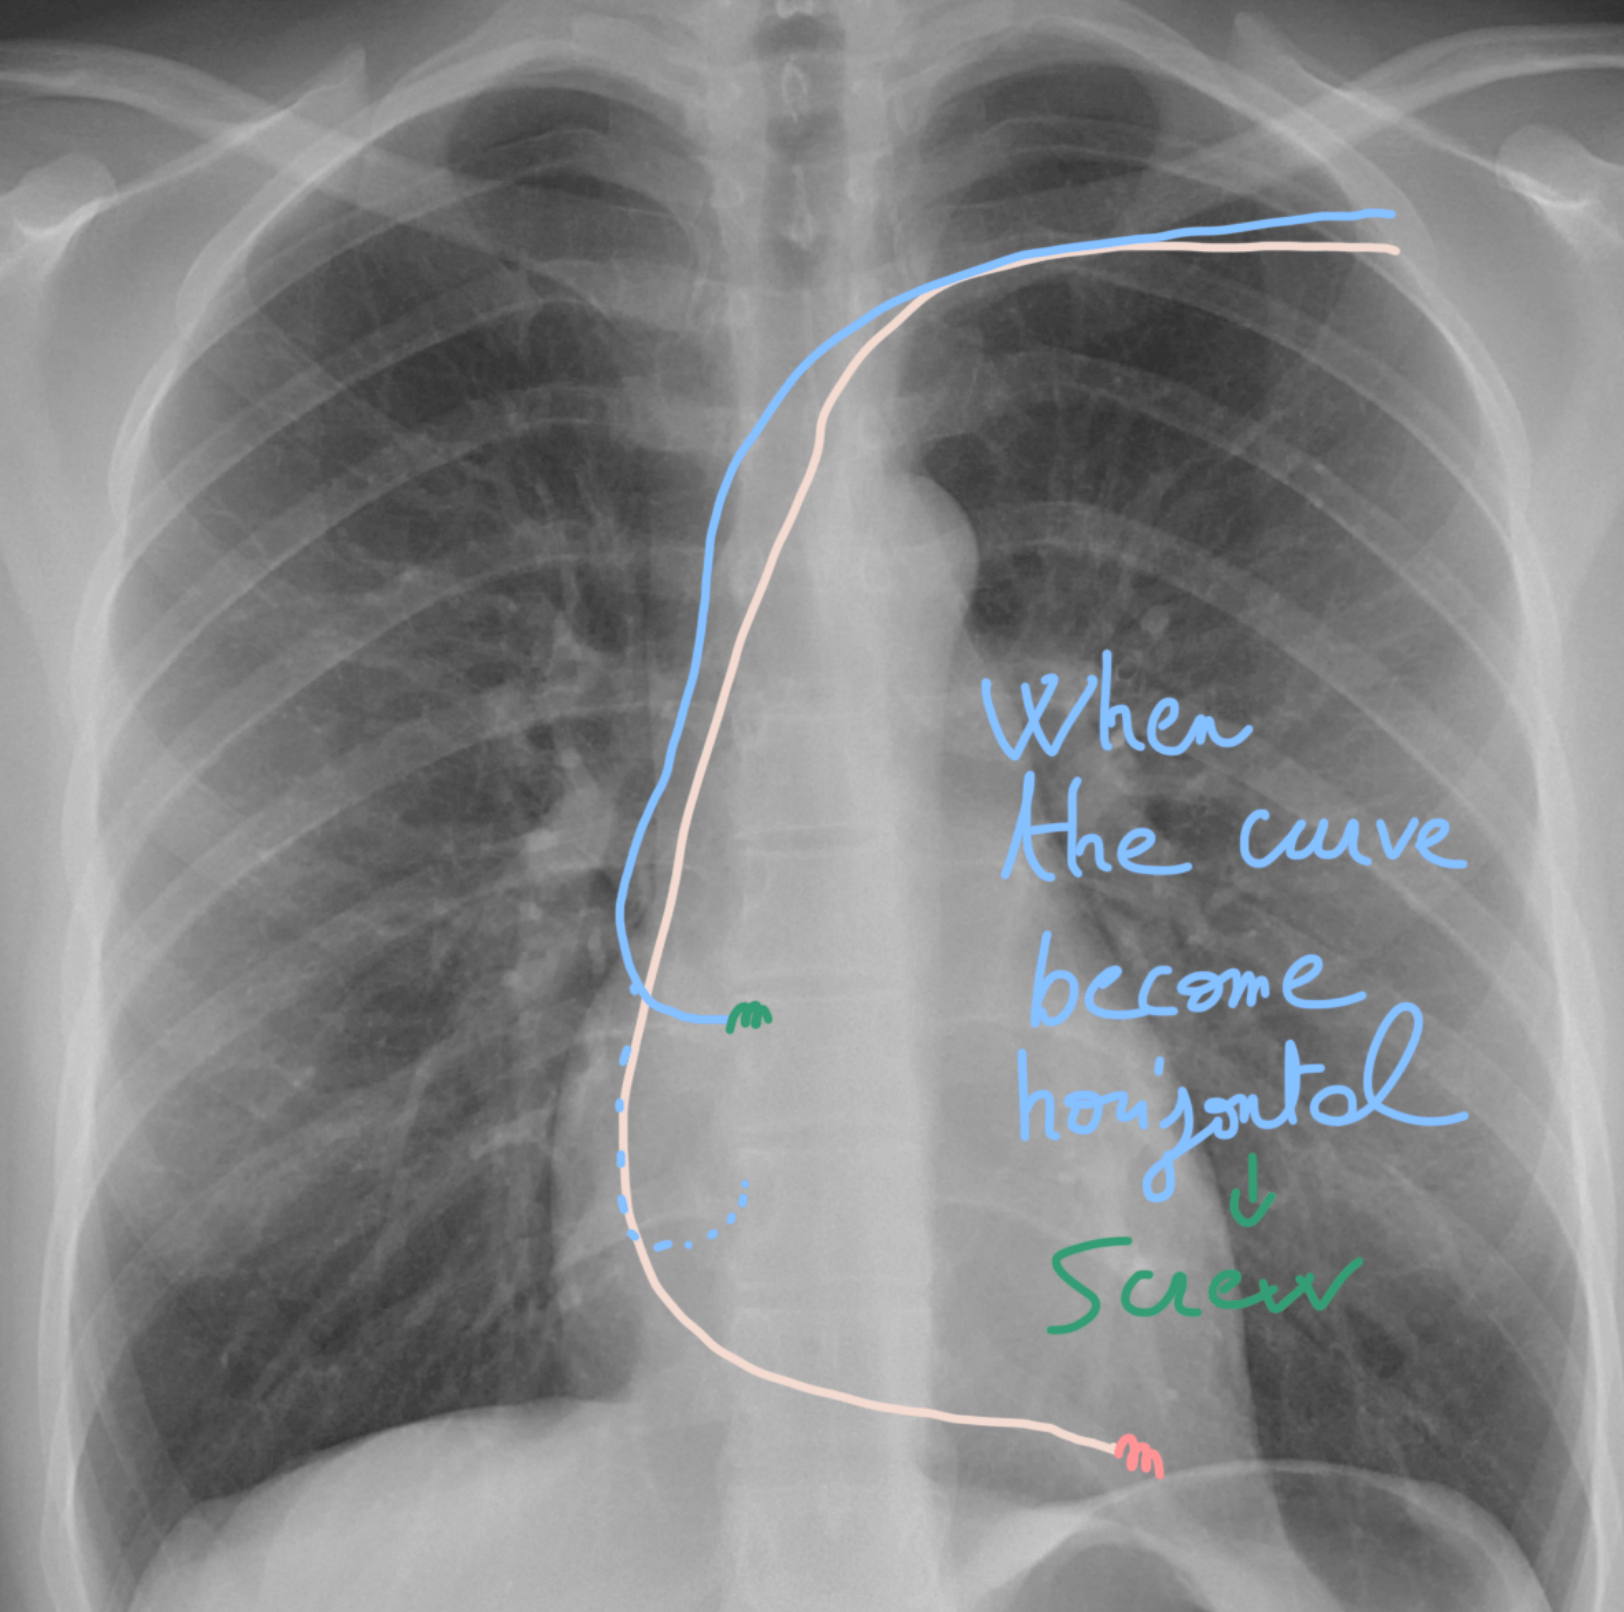
🌀 Step 22: Catch & screw the atrial lead! 🎯
This part gets a bit more technical — so hang on! 💪
👉 Gently pull on the atrial lead until you “catch” the RAA 🎣.
You’ll notice the lead will start to horizontalize 📏 — that’s your signal!
✅ As soon as it’s horizontal, it’s time to screw it in 🔩 to secure the position.
Think of it like docking a spaceship 🛸: once it lines up perfectly, lock it down! 🚀
🏅 Final Step: Test, secure & close! 🔧🧵
Before you celebrate 🎉, make sure everything is perfect:
👉 Just like for the ventricular lead, measure the:
Current of injury ⚡
Sensing 👂
Threshold 🎯
Impedance 📊
✅ If all is good, you can:
Fix the leads proximally to the muscle 💪
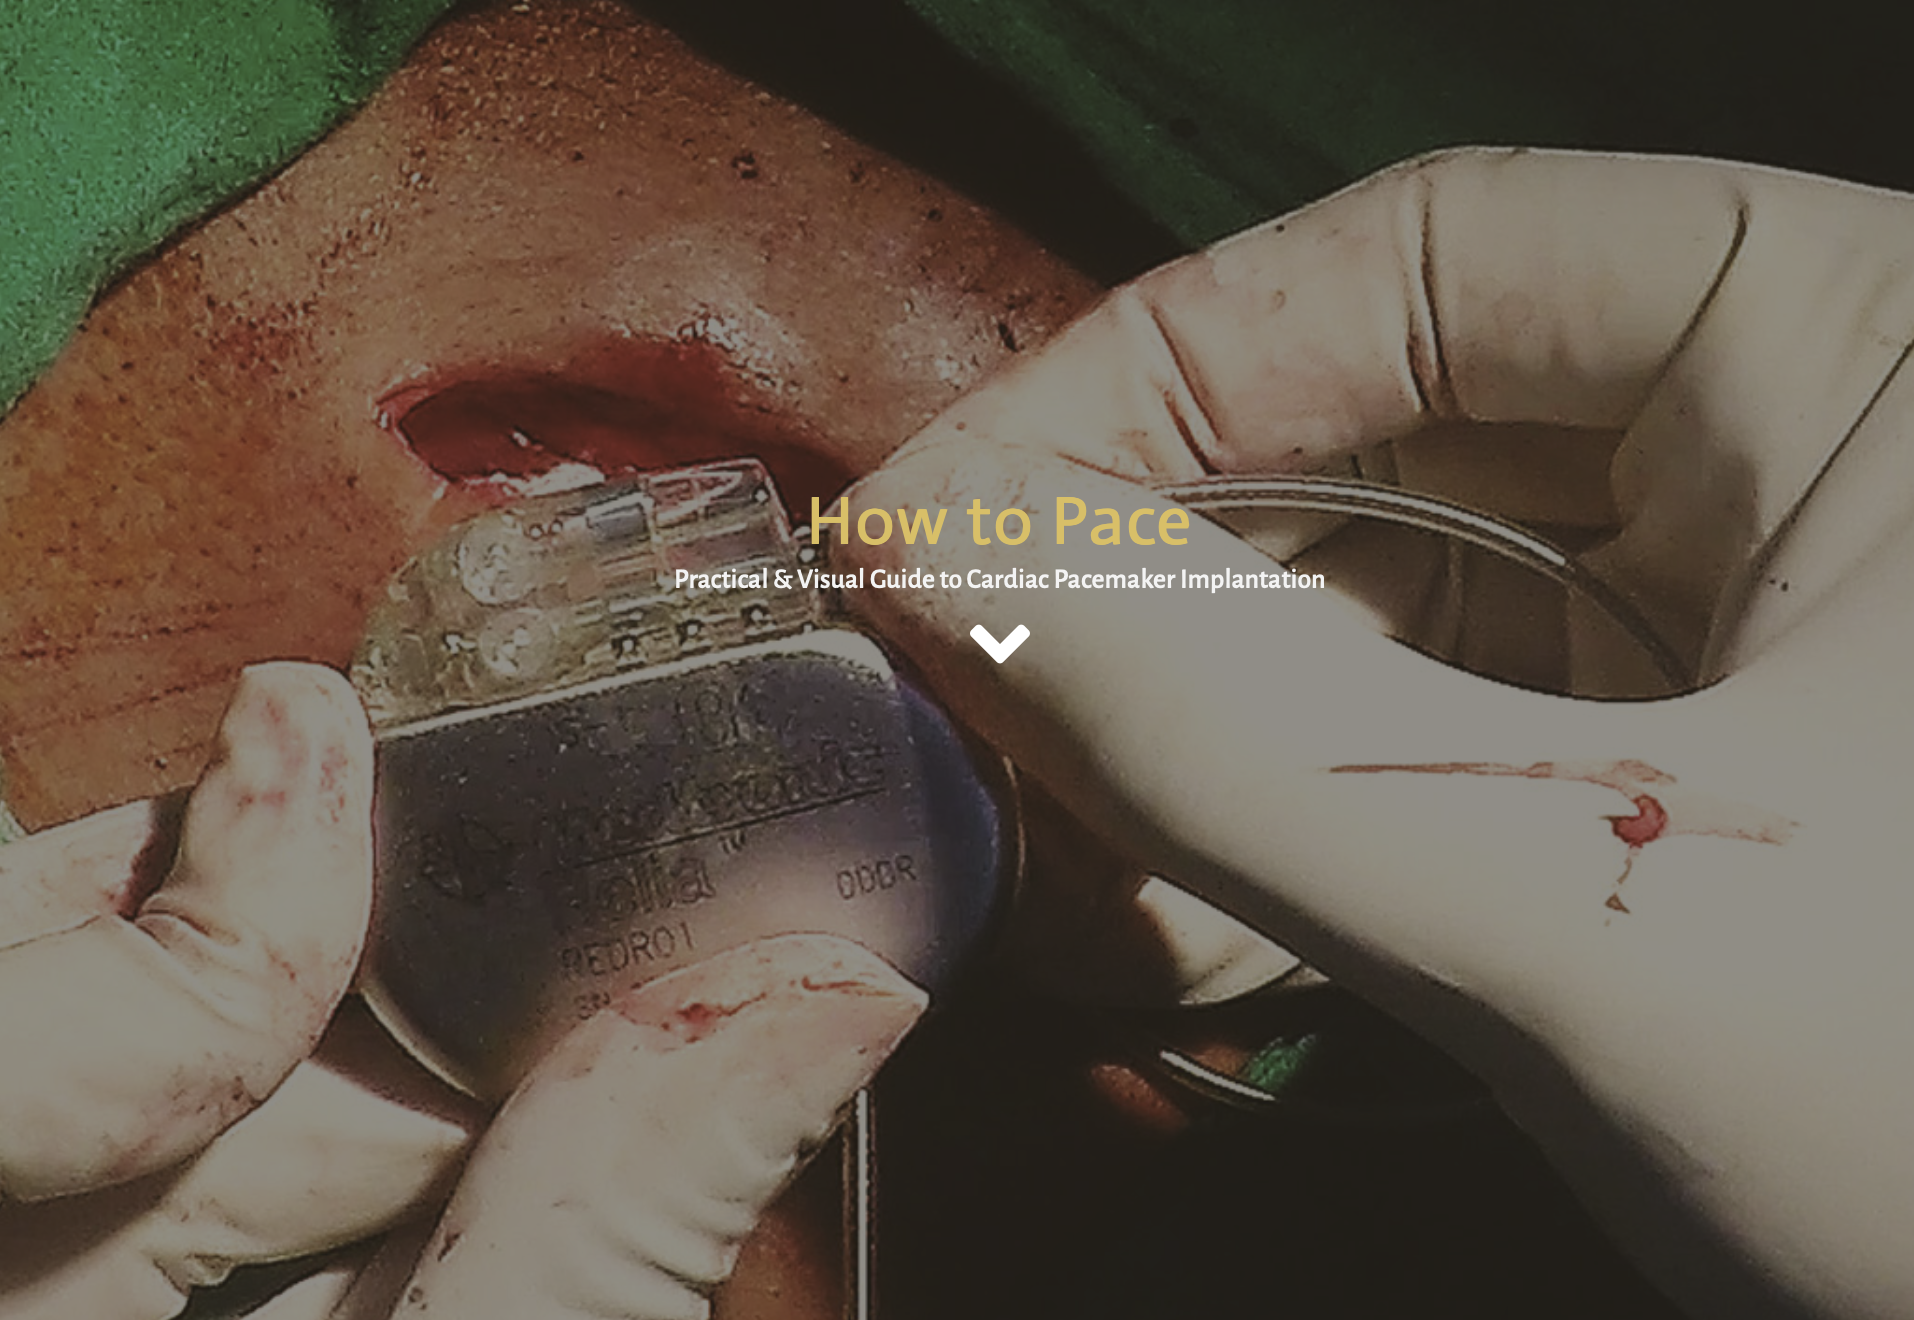
Place the generator inside the pocket 📦
Close the skin carefully 🧵✨
Think of it like the grand finale 🎬: double-check, secure the system, close the curtain, and your show is complete! 🚀
🌐✨ Bonus Resource: HowToPace.com ✨🌐
This is an amazing website 🖥️📚 with tons of tips, tricks, and resources 🧰🔧 that’ll help you master pacemaker & ICD implantation 🫀⚡.
🚀💡 Think of it as your online toolbox 🔨🛠️, your GPS for implantation 🧭📍, and your 24/7 mentor 👨⚕️👩⚕️ — all in one place! 🎯🙌
🎉💪 With it, you’ll feel more confident 💎, more skilled 🏅, and ready to rock every implant like a pro 🤘😎.